Update 6/12/2018 – Updated Task Sequence with all Tweaks, you can grab what you want, or nest it as a “Run TS Step”. Download HERE
Many of the steps are now just Registry Keys (Reg Add). I’ve added some Fixes and other things that have come up over the past couple upgrades, feel free to take it or leave it. Confirmed LockScreen works in 1803, however I’ve found you MUST overwrite the default ones, even if you’re using the Group Policy or Registry Key to enforce a specific one, it’s best to overwrite the default one with the one you wish to use, then set Group Policy or the Registry key to enforce that one.
Also, in the Default Profile section, a couple of additional registry keys to help control the lock screen experience, thanks to Doug (managedoug.com) for the tip on that.
There are probably corresponding Group Policies, but I’ve been unable to find anything.
UPDATE 3/22/2017 – I’ll be revamping nearly all of this with updated scripts and better processes I’ve learned over the past year of Deploying Windows 10. I’ll be doing it after I present on it at MMS. If you’d like any tips before then, catch me on Twitter – @gwblok
I will also be providing all of the updated Content for a Package & Exported TS with all of the steps. All you’ll have to do is replace images with your own corporate images and update any Content Locations. – Now Available – https://garytown.com/windows-10-customizations-mms2017-demos
Updated 11/30/2015 – Remove Default Apps Section – Disable New Apps Auto Install in Windows 10 Update 1511
Updated 6/7/2016 – Added more info about Lock Screen Wallpaper replacement.
Update 11/8/2016 – More Lock Screen Info
This is a collection of “Tweaks” I make to our Windows 10 deployments to improve user experience and do branding. I’ll admit upfront that most of these ideas are not original to me, I’ve borrowed and adapted several things for my own needs. When possible, I post a link to the blog post that helped me. I hope you find useful this compilation of Tweaks. (Download of scripts / files used are at bottom)
– Please Note, if you try to copy / paste some scripts from this page, the “quote” marks typically get messed up and would need to be fixed… or just use the scripts in the download
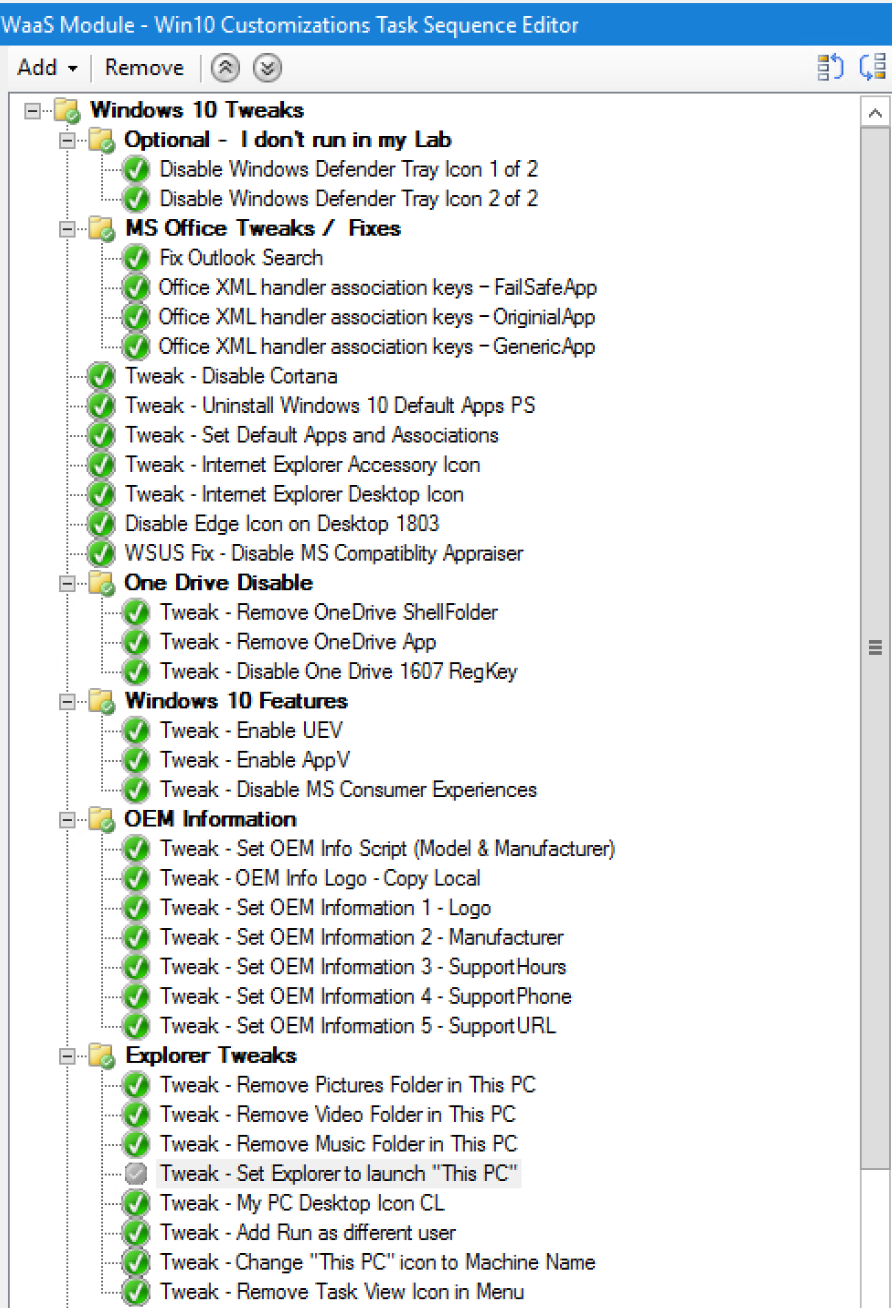
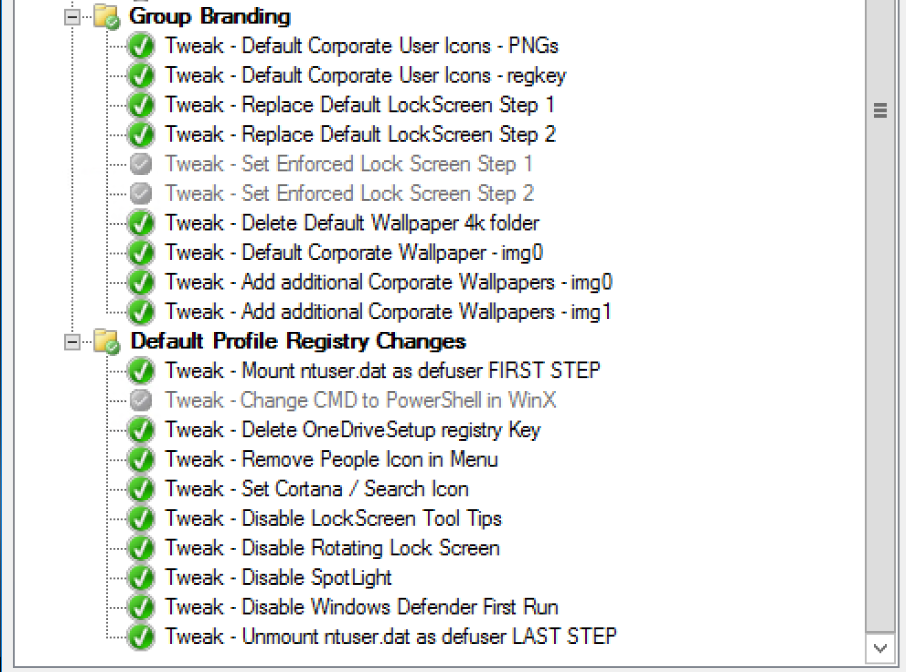
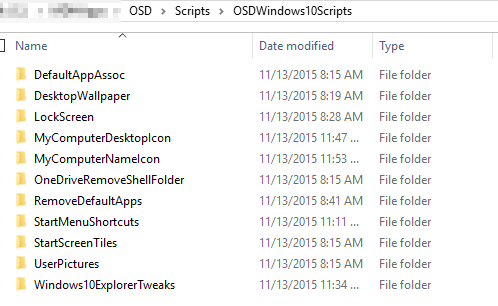
First things, I’ve got a “OSDWindows10Scripts” package, with several subfolders that I keep all of the customizations in, which I can then reference during OSD.
I’m going to go through them folder by folder to explain which each does and how it’s used in the Task Sequence.
DefaultAppAssoc (Change Default Applications for Extensions)
This Customization was developed by Johan
Info taken from: http://deploymentresearch.com/Research/Post/507/Setting-Internet-Explorer-as-your-default-browser-in-Windows-10-during-OS-Deployment
Currently I used this to set .PDF to Adobe Reader (Instead of Edge) and make Internet Explorer as the Default browser.

In the TS, it looks like this:
Dism.exe /online /Import-DefaultAppAssociations:DefaultAppAssoc\Win10DefaultAppAssoc.xml

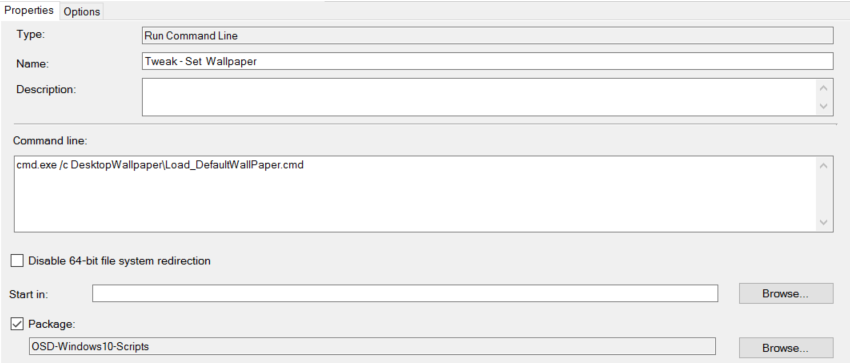
Desktop WallPaper (Set the Default WallPaper)
Info taken From: http://ccmexec.com/2015/08/replacing-default-wallpaper-in-windows-10-using-scriptmdtsccm/
nothing fancy here, we’re just over writing the default Windows Wallpaper image with our own.
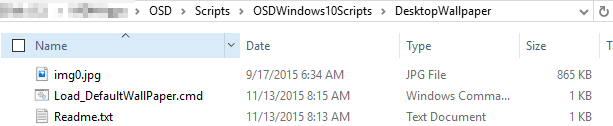
cmd.exe /c DesktopWallpaper\Load_DefaultWallPaper.cmd
LockScreen (Sets the LockScreen Image)
Update 6/7/16 – You can also do this via group policy – info HERE
Update 11/8/16 – Using this method below, in 1607 will prevent users from changing it themselves. – Added Second Method that will still allow users to change their Lock Screen Image.
Originally Adapted from: http://www.ohmancorp.com/RefWin-windows8-change-pre-login-screen-background.asp
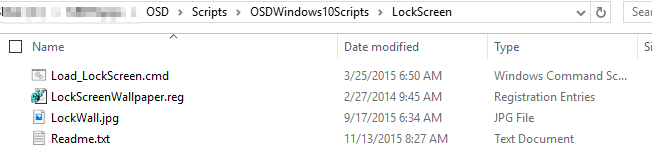
Load_LockScreen.cmd:
—–
REM Copy Wallpaper locally
xcopy LockScreen\LockWall.jpg C:\Cabs\LockWallpaper\ /Y /S
REM Import Registry Key to set the background
reg import LockScreen\LockScreenWallpaper.reg
reg import LockScreen\LockScreenWallpaper.reg /reg:64
—–
Registry File:
Windows Registry Editor Version 5.00
[HKEY_LOCAL_MACHINE\SOFTWARE\Policies\Microsoft\Windows\Personalization]
“LockScreenImage”=”C:\\Cabs\\LockWallpaper\\LockWall.jpg”
—–
As you can see, all that happens is the LockScreen WallPaper is copied local, and a registry setting points to it.
EDIT: 6/7/2016 – Working on new post to cover disabling those Tool Tips in OSD. Did not have any luck with Group Policy disabling it.
More info: https://technet.microsoft.com/en-us/itpro/windows/whats-new/windows-spotlight
EDIT: 11/8/2016 Added Method 2
LockScreen Method 2, sets the lock screen you want, but still allows users to change lock screen image in settings

Those two image files that you select, will replace two of the files here: C:\Windows\Web\Screen
img100.jpg is the default, but if you want to add any other corporate branded pictures, you can just add them to your list of files to copy.

Script: – One line per picture: xcopy LockScreen\img100.jpg C:\Windows\Web\Screen\ /Q /Y
![]()
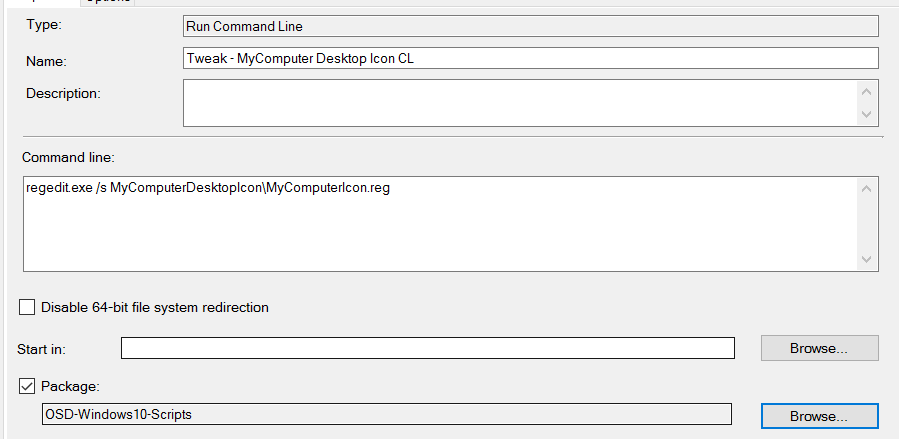
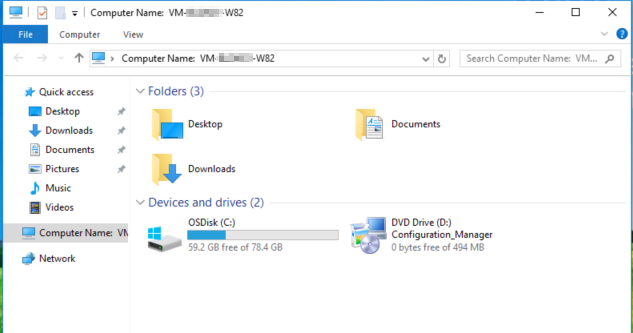
MyComputerDesktopIcon (Adds the “My Computer” Icon to the Desktop)

MyComputerIcon.reg
Windows Registry Editor Version 5.00
[HKEY_LOCAL_MACHINE\Software\Microsoft\Windows\CurrentVersion\Explorer\HideDesktopIcons\NewStartPanel]
“{20D04FE0-3AEA-1069-A2D8-08002B30309D}”=dword:00000000
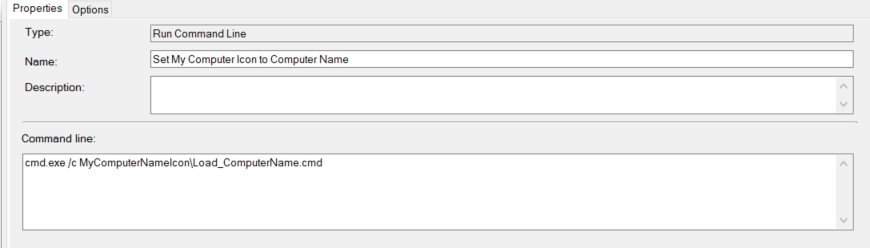
MyComputerNameIcon (Changes the Name of “My Computer” to the actual name of the PC)
You can see an Example lower down in the “Windows10ExplorerTweaks” Section

This has been handy, so users have an easier time finding their computer names when contacting support, We just tell them to look on their desktop, and the Icon for “My Computer” actually says “Computer Name = %COMPUTERNAME%”
Script File (Load_ComputerName.cmd)
MyComputerNameIcon\setacl.exe -on “HKCR\CLSID\{20D04FE0-3AEA-1069-A2D8-08002B30309D}” -ot reg -actn setowner -ownr “n:Administrators”
MyComputerNameIcon\SetACL.exe -on “HKCR\CLSID\{20D04FE0-3AEA-1069-A2D8-08002B30309D}” -ot reg -actn ace -ace “n:Administrators;p:full”
MyComputerNameIcon\SetACL.exe -on “HKCR\CLSID\{20D04FE0-3AEA-1069-A2D8-08002B30309D}” -ot reg -actn ace -ace “n:SYSTEM;p:full”
reg import MyComputerNameIcon\ComputerName.reg /reg:64
ComputerName.reg:
Windows Registry Editor Version 5.00
[HKEY_CLASSES_ROOT\CLSID\{20D04FE0-3AEA-1069-A2D8-08002B30309D}]
“LocalizedString”=hex(2):43,00,6f,00,6d,00,70,00,75,00,74,00,65,00,72,00,20,00,\
4e,00,61,00,6d,00,65,00,3a,00,20,00,20,00,25,00,43,00,4f,00,4d,00,50,00,55,\
00,54,00,45,00,52,00,4e,00,41,00,4d,00,45,00,25,00,00,00
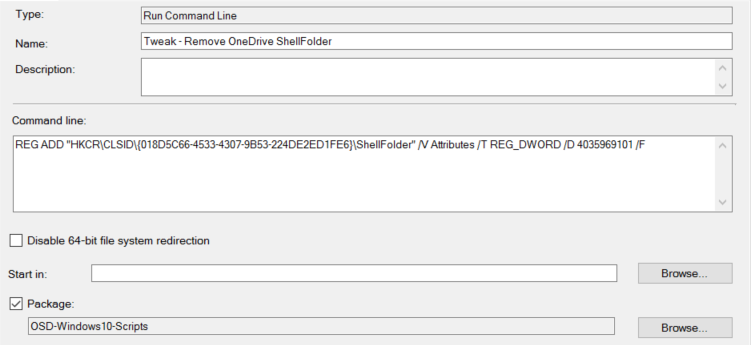
OneDriveRemoveShellFolder (Removes the OneDrive Folder on the Left Pane in Explorer)
Update 04/21/2016 – Updated Info about OneDrive – New Post here: http://garytown.com/onedrive-disable-hide-in-windows-10
Idea adapted from: http://www.tenforums.com/tutorials/4818-onedrive-add-remove-navigation-pane-windows-10-a.html

I don’t actually use these files, but keep them for documentation.
RemoveDefaultApps (Remove MOST of the Win 10 Default Apps, but leaves what we wanted, Calc, Alarms, Weather, Maps)
Adapted from: http://blogs.technet.com/b/mniehaus/archive/2015/11/11/removing-windows-10-in-box-apps-during-a-task-sequence.aspx
Edit 6/7/16 – Found this recently, another great way to do it: http://www.scconfigmgr.com/2016/03/01/remove-built-in-apps-when-creating-a-windows-10-reference-image/


Script: —–
<#
************************************************************************************************************
Purpose: Remove built in apps specified in list
Pre-Reqs: Windows 10
************************************************************************************************************
#>
#—————————————————————————————————————
# Main Routine
#—————————————————————————————————————
# Get log path. Will log to Task Sequence log folder if the script is running in a Task Sequence
# Otherwise log to \windows\temp
try
{
$tsenv = New-Object -COMObject Microsoft.SMS.TSEnvironment
$logPath = $tsenv.Value(“LogPath”)
}
catch
{
Write-Host “This script is not running in a task sequence”
$logPath = $env:windir + “\temp”
}
$logFile = “$logPath\$($myInvocation.MyCommand).log”
# Start logging
Start-Transcript $logFile
Write-Host “Logging to $logFile“
# List of Applications that will be removed
$AppsList = “Microsoft.XboxGameCallableUI”,“Microsoft.XboxIdentityProvider”,“Windows.ContactSupport”,“microsoft.windowscommunicationsapps”,“Microsoft.BingNews”,“Microsoft.Getstarted”,“Microsoft.BingFinance”,“Microsoft.XboxApp”,“Microsoft.SkypeApp”,“Microsoft.ZuneVideo”,“Microsoft.ZuneMusic”,“Microsoft.WindowsPhone”,“Microsoft.People”,“Microsoft.Office.OneNote”,“Microsoft.MicrosoftSolitaireCollection”,“Microsoft.MicrosoftOfficeHub”,“Microsoft.BingSports”,“Microsoft.3DBuilder”,“Microsoft.WindowsFeedback”
ForEach ($App in $AppsList){
$Packages = Get-AppxPackage | Where-Object {$_.Name -eq $App}
if ($Packages -ne $null)
{
Write-Host “Removing Appx Package: $App“
foreach ($Package in $Packages)
{
Remove-AppxPackage -package $Package.PackageFullName
}
}
else
{
Write-Host “Unable to find package: $App“
}
$ProvisionedPackage = Get-AppxProvisionedPackage -online | Where-Object {$_.displayName -eq $App}
if ($ProvisionedPackage -ne $null)
{
Write-Host “Removing Appx Provisioned Package: $App“
remove-AppxProvisionedPackage -online -packagename $ProvisionedPackage.PackageName
}
else
{
Write-Host “Unable to find provisioned package: $App“
}
}
# Stop logging
Stop-Transcript
——
Disable Microsoft Consumer Experiences (Additional Apps Auto Installed ) Updated 11/30 – More Info: http://blogs.technet.com/b/mniehaus/archive/2015/11/23/seeing-extra-apps-turn-them-off.aspx

Registry File: DisableMSConsumerExperiences.reg
Windows Registry Editor Version 5.00
[HKEY_LOCAL_MACHINE\SOFTWARE\Policies\Microsoft\Windows\CloudContent]
“DisableWindowsConsumerFeatures”=dword:00000001
StartMenuShortcuts
This folder contains Pinned Site Shortcuts to frequently used Websites, or ones I want them to know about.
The Application Catalog, Google (Named Internet Explorer)
I named it Internet Explorer, to use it as an Icon in the Start Menu for IE (As IE is not able to be Pinned in Windows 10)
more info in the next Section.
In the Sample Files, I’ve changed the Application Catalog to point to MS. Just Replace it with a Pinned Site Shortcut to your Application Catalog.
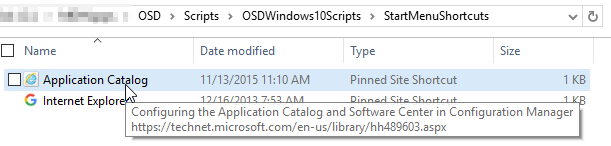
I just copy these .website files into the Start Menu.
xcopy StartMenuShortcuts\* “%SystemDrive%\ProgramData\Microsoft\Windows\Start Menu\Programs” /Q /Y /I
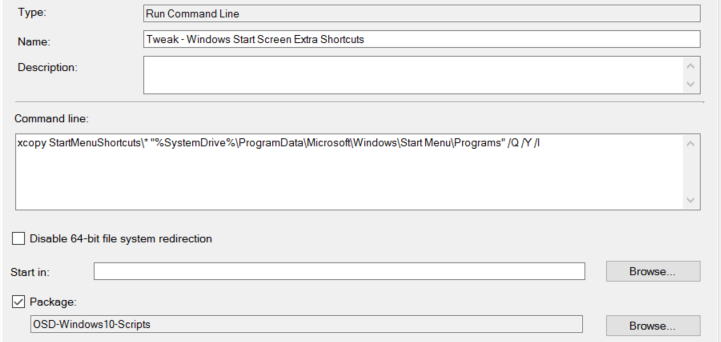
StartScreenTiles (Create Custom Start Menu)
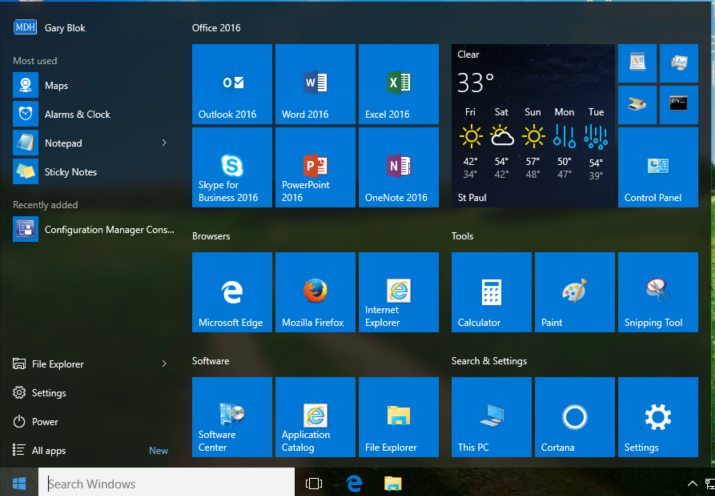
Info taken from: https://technet.microsoft.com/en-us/library/dn283401%28v=wps.630%29.aspx

On your reference Machine, configure the Start Menu how you would like it to be (Note, Internet Explorer 11 will not Stay Pinned to your Start Menu, I’ve created a Workaround by using an IE pinned Shortcut file called Internet Explorer.website that I copy into the Program Menu during OSD) (Last Section)
Once you’ve created your Start Menu how you like:
Elevated Powershell
Export-StartLayout -Path “c:\CMSource\StartMenuLayout.bin” (Then Copy that .bin file to your Package)
In my folder structure, I have a couple of different versions, my main one is v2, but if I have to make changes for new applications, I’ll add v3. It’s nice to have version controls. (v1 had office 2013 instead of office 2016, so If I deploy a machine with Office 2013, I can use a variable to use v1 startmenu with Office 2013 shortcuts instead)
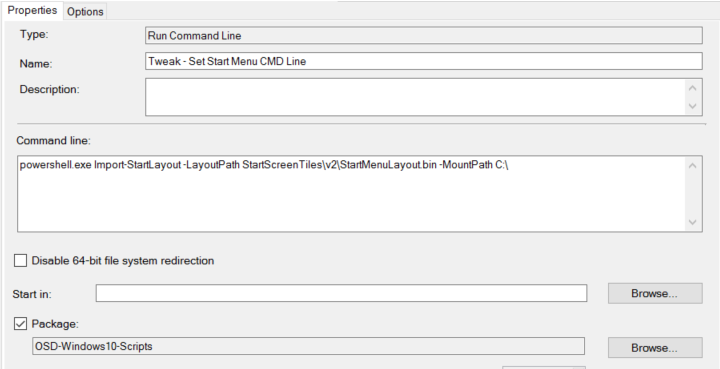
During OSD, just use a Powershell command to import the Start Menu: powershell.exe Import-StartLayout -LayoutPath StartScreenTiles\v2\StartMenuLayout.bin -MountPath C:\
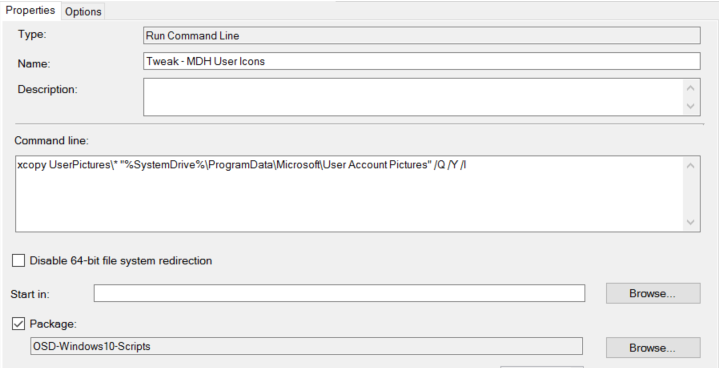
UserPictures (This will replace the default user.png file with whatever corporate one you want)
Note, this requires GPO to be set:
Computer Configuration > Administrative Templates > Control Panel > User Accounts.
Double-click Apply the default user logon picture to all users, and enable this setting. Click OK/Apply and Exit
Or, set a registry Key:
HKEY_LOCAL_MACHINE\SOFTWARE\Microsoft\Windows\CurrentVersion\Policies\Explorer
In the right panel, right click and select New > DWORD (32-bit) Value. Give it name UseDefaultTile.
Click on Modify. Enter Value data as 1 for this DWORD (32-bit) and hit OK. A new registry enter will be added.
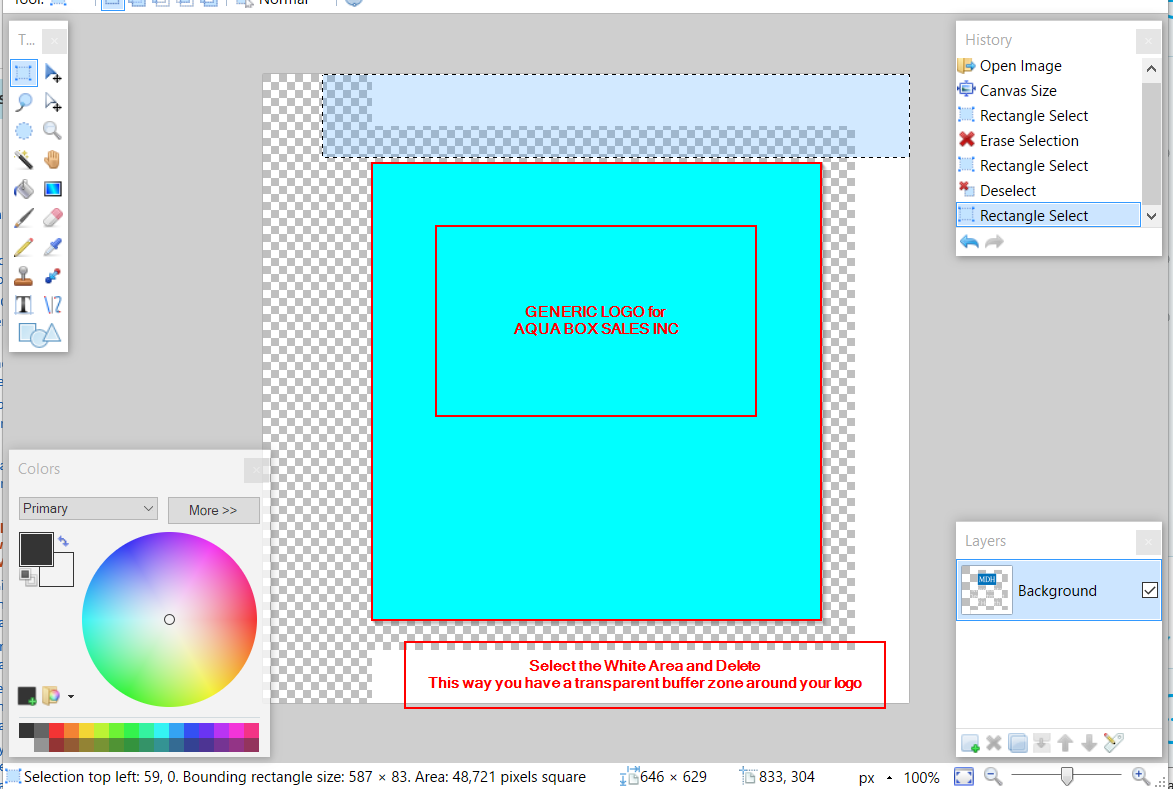
This I did because of Branding, our Communication Department provided me with the .png logo files, which I then had to modify to look good in Windows 10 “Profile CIRCLE” they use. Because it’s a CIRCLE, it would cut off the edges, so I used Paint.NET to increase the Canvas Size so when Windows trims the edges to fit the CIRCLE window, it doesn’t cut off any of the logo.
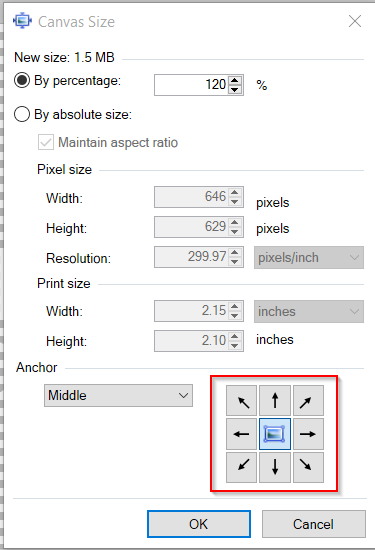
Once it enlarges the Canvas, you’ll have to Delete the “White Space”
Once you have your Company Logos Created, you can then use a simple copy command.
xcopy UserPictures\* “%SystemDrive%\ProgramData\Microsoft\User Account Pictures” /Q /Y /I
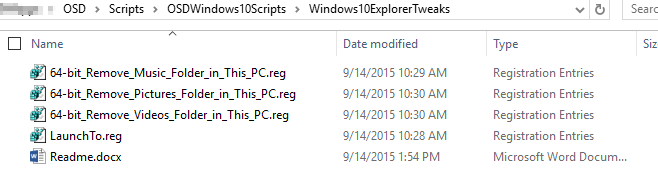
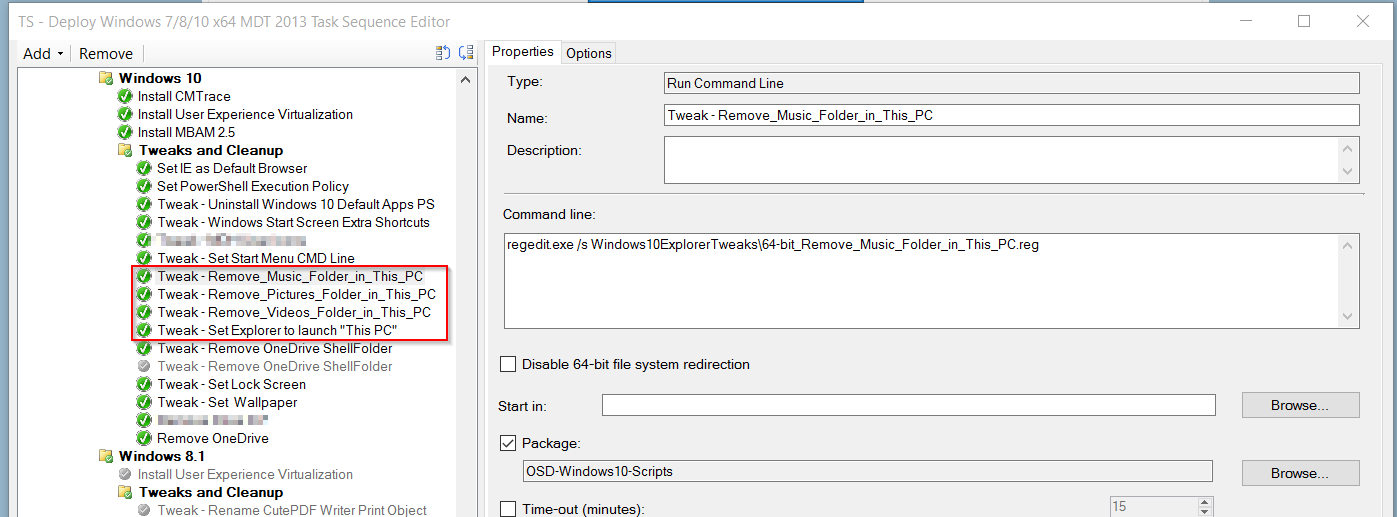
Windows 10 Explorer Tweaks (Cleans up Explorer, sets the “Launch To”)
Idea adapted from here: http://www.tenforums.com/tutorials/6015-pc-folders-add-remove-windows-10-a.html
This will clean up Explorer, goes straight to this, instead of using the Quick Access view.
I then use a separate Step in the TS to import Each Key:
RegFiles: (You can download them from the Site too: http://www.tenforums.com/tutorials/6015-pc-folders-add-remove-windows-10-a.html)
LaunchTo.reg
Windows Registry Editor Version 5.00
[HKEY_LOCAL_MACHINE\SOFTWARE\Microsoft\Windows\CurrentVersion\Explorer\Advanced]
“LaunchTo”=dword:00000001
—-
64-bit_Remove_Music_Folder_in_This_PC.reg
Windows Registry Editor Version 5.00
; Created by: Shawn Brink
; http://www.tenforums.com
; Tutorial: http://www.tenforums.com/tutorials/6015-pc-folders-add-remove-windows-10-a.html
[HKEY_LOCAL_MACHINE\SOFTWARE\Microsoft\Windows\CurrentVersion\Explorer\FolderDescriptions\{a0c69a99-21c8-4671-8703-7934162fcf1d}\PropertyBag]
“ThisPCPolicy”=”Hide”
[HKEY_LOCAL_MACHINE\SOFTWARE\Wow6432Node\Microsoft\Windows\CurrentVersion\Explorer\FolderDescriptions\{a0c69a99-21c8-4671-8703-7934162fcf1d}\PropertyBag]
“ThisPCPolicy”=”Hide”
—–
64-bit_Remove_Pictures_Folder_in_This_PC.reg
Windows Registry Editor Version 5.00
; Created by: Shawn Brink
; http://www.tenforums.com
; Tutorial: http://www.tenforums.com/tutorials/6015-pc-folders-add-remove-windows-10-a.html
[HKEY_LOCAL_MACHINE\SOFTWARE\Microsoft\Windows\CurrentVersion\Explorer\FolderDescriptions\{0ddd015d-b06c-45d5-8c4c-f59713854639}\PropertyBag]
“ThisPCPolicy”=”Hide”
[HKEY_LOCAL_MACHINE\SOFTWARE\Wow6432Node\Microsoft\Windows\CurrentVersion\Explorer\FolderDescriptions\{0ddd015d-b06c-45d5-8c4c-f59713854639}\PropertyBag]
“ThisPCPolicy”=”Hide”
—–
64-bit_Remove_Videos_Folder_in_This_PC.reg
Windows Registry Editor Version 5.00
; Created by: Shawn Brink
; http://www.tenforums.com
; Tutorial: http://www.tenforums.com/tutorials/6015-pc-folders-add-remove-windows-10-a.html
[HKEY_LOCAL_MACHINE\SOFTWARE\Microsoft\Windows\CurrentVersion\Explorer\FolderDescriptions\{35286a68-3c57-41a1-bbb1-0eae73d76c95}\PropertyBag]
“ThisPCPolicy”=”Hide”
[HKEY_LOCAL_MACHINE\SOFTWARE\Wow6432Node\Microsoft\Windows\CurrentVersion\Explorer\FolderDescriptions\{35286a68-3c57-41a1-bbb1-0eae73d76c95}\PropertyBag]
“ThisPCPolicy”=”Hide”
—-
I hope you find this useful, if you have any comments, improvements, give me a shout out on Twitter @gwblok
Download the OSDWindows10Scripts Folder here: http://garytown.com/Downloads/OSDWindows10Scripts.zip
Hello.
Great guide!
im getting a warning on the rename computer icon.
The normal “do you trust this registry change bla bla”
any idea how to silence that?
Hey, the one I uploaded, I forgot to add the folder name in the path. The Script should look like this:
MyComputerNameIcon\setacl.exe -on “HKCR\CLSID\{20D04FE0-3AEA-1069-A2D8-08002B30309D}” -ot reg -actn setowner -ownr “n:Administrators”
MyComputerNameIcon\SetACL.exe -on “HKCR\CLSID\{20D04FE0-3AEA-1069-A2D8-08002B30309D}” -ot reg -actn ace -ace “n:Administrators;p:full”
MyComputerNameIcon\SetACL.exe -on “HKCR\CLSID\{20D04FE0-3AEA-1069-A2D8-08002B30309D}” -ot reg -actn ace -ace “n:SYSTEM;p:full”
reg import MyComputerNameIcon\ComputerName.reg /reg:64
Let me know if that resolves it for you. – I’ve updated the Script in the download to reflect that change.
Great write up. Several of these I was already doing but not necessarily in the same method you are and yours seem to be much cleaner.
Have you ever tried to script all the silly active setup stuff or whatever new app setup stuff there is, that would probably slow down a profile creation on a first login?
I have not doing anything with the initial app setup stuff. The only thing I’ve done is have it delete most of the Apps during OSD.
Ok Gary, I have ported your steps to OSConfig. Still waiting on your test results . . . feedback appreciated 🙂
https://winpeguy.wordpress.com/2015/12/08/tool-osconfig-for-garytown/
Excellent guide, many thanks Gary, this addresses several things I was looking to do. Keep up the good work!
what are the proper steps to creating a package for this and distributing it? it failed to go out to my DP. How should i have this setup and what is the proper package creation process for this? I am a bit of a noob so i am still figuring things out.
You need to have the folder on your ConfigMgr source share, create a package with that folder as the content, then distribute. You can then call it during OSD. It’s really no different than creating any other package, but you don’t need to create any programs for it.
Hi,
This was exactly what I was looking for.
I had already started making my own scripts…
Im curious though as to your thoughts on whether these customizations should be added to the gold image, or “just in time” during osd deployment?
I found that a lot of the tweaks will get wiped out during the B&C process. Since not all of them work during B&C, I like to keep all of the Tweaks in once place, so I apply them all during OSD. Most of them are quick and I’ve found don’t add much time to the OSD process. I’m also a fan of having a light, clean base WIM to apply.
Great blog Gary,
Where in Task Sequence do you add your “Tweaks and CleanUp” step ?
Is it right after applying OS ?
In my TS, I’ve got it setup like:
Install OS
Bios Stuff (Update Bios, TPM, etc, But I make sure UEFI & Secure boot are enabled before the OS Install Step)
Install Apps that aren’t in the base image (Java, VLC, Reader, etc)
Tweaks & Cleanup
Enable Bitlocker
Is it possible to add these tweaks to a provisioning package?
I’ve decided to upgrade via hardware refresh instead of wipe/reload and want to leverage the provisioning tools.
Also thanks for these write-ups, I’ve been trying to make some of these seemingly simple things happen and will try your scripts!
Unsure, I haven’t done any work with the provisioning package yet. If you do get it working, I’d be interested to hear your results.
Ugh! I’m going crazy over here. I can’t seem to get the OneDrive piece to work. I have added a “run command line” step with “REG ADD “HKCR\CLSID\{018D5C66-4533-4307-9B53-224DE2ED1FE6}\ShellFolder” /V Attributes /T REG_DWORD /D 4035969101 /F” as the value. It shows as having run successfully in the OSD report, but the value is the default (ending in 9505, I think). I’ve even tried running the command from an elevated command prompt (both as a local admin and as system), still the value doesn’t seem to change. What am I missing? This is on Windows 10 x64 Build 1511. :/
I have a question about the StartMenuShortcuts topic. In your example, the “Internet Explorer” pinned site shortcut has the Google icon. When you import the startmenu, the Google icon is not shown on the tile. For my company, I need to add a few url shortcuts to the startmenu, but I want those shortcut tiles to show the websites icon. When I add those shortcuts manually to the startmenu, the icons are shown. Do you know how I can fix this?
I was able to get the lock screen and wallpaper to change, but I am still getting the default blue Windows login screen. Has anyone have any luck changing this?
Nice work! Thanks for sharing.
Silly question… Can I run this Scripts individually as I don’t have access to ConfigMgr?
Thanks
They should work with any imaging solution. Many need to be run before a user logs in, as they modify the default profile. If you don’t have access to ConfigMgr, I’d highly recommend using MDT if you’re looking for a Free solution.
Hi do you have a fix for the user profile pic? It seems that the 1607 update has a new one that’s semi transparent and shows only in the log in screen.
Thanks!
In my environment, this method is still working for 1607. I did see what you’re referring to about the semi-transparent user logo on my personal laptop. But in our corporate environment, the logos, even the “other user” logo are defaulting to our corporate logo. I’ll see if I can reproduce the issue here, but unsure what would cause the difference if you’re replacing those .png files during OSD.
Have been trying to replicate your package folder structure with MDT 2013 with no luck. I do not have ConfigMgr. It appears that MDT creates packages differently. Every time I point to the OSDWindows10Scripts source folder MDT steps through and eventually says “no packages found to import”. Is it possible to do this with MDT?
I’d probably try this first. Copy the Folder into the deployment share “Scripts” folder. Then in the TS, you can use “Run Command Line” with “%SCRIPTROOT%\Win10OSD\ScriptName.cmd”
Instead of a package, then you can use the %SCRIPTROOT% to reference the location. Ideally you’d make a new folder with a variable for that folder like %WIN10SCRIPTS%. I’ve never done that, but imagine you could.
Hi Gary.
Great Blog.
I used thos section in my TS DefaultAppAssoc (Change Default Applications for Extensions) to change pdf, browser and a few others.
But some windows updates keeps on resetting these settings.
Do you have any tips you can share on how to disable that or make sure windows updates dont change our default apps.
Kind Regards
I’ve not seen this often, but I have used group policy to set default apps as well, that might be something you could try.
Hi Gary,
I’m noticing that folks are reporting that the DISM feature to import default app associations is not currently working in 1511 and 1607 (TechNet Link: https://social.technet.microsoft.com/Forums/en-US/d5fad871-8f5e-4c74-abaf-627809f8844b/). I haven’t attempted to make this work as of yet, but have you run into issues with this?
Hey Justin, It’s been working in 1511 for me, I’ll be testing in 1607 soon.
I am encounter the same problem. Task sequence error out and the deployment stopped. I have to take this out of task sequence for now till Microsoft has a solution.
I am encountering the same problem. Task sequence error out and the deployment stopped. I have to take this out of task sequence for now till Microsoft has a solution.
You can also check out this post to see if it offers a solution. https://deploywindows.info/2016/09/13/how-do-i-customize-the-default-file-associations/
Gary,
I have found that using the Powershell Script above to RemoveDefaultApps in a SCCM Task Sequence leaves ghost icons for the deleted default apps on an imaged machine.
What I do to get around the ghost icon problem (I’ve read a few more ways too) is to delete all the desired default apps with CCleaner in my reference VM before I extract the .wim with MDT for use in SCCM . Then, I put the same apps I deleted in the PowerShell script which runs in the Task Sequence – no more ghost icons.
When I set a custom lock screen after the 1607 update and then lock my pc, the lock screen will be black. If I hit a button (for the lock screen to go away), then my custom image will show up while im typing in my password.
Anyone else have this issue?
Basically this issue: http://answers.microsoft.com/en-us/windows/forum/windows_10-hello/lockscreen-issue-windows-10-anniversary-update/62abf7bd-172c-464b-86f5-102c919f130a?page=1
but i need a fix for our image.
I am looking for a way to hide the user account picture including the default picture on the login/sign in screen of Windows 10 1607. I do not want any user account picture here at all. I have done this in past by deleting default pictures in: C:\ProgramData\Microsoft\User Account Pictures, but this no longer works in Windows 10 1607. Apparently in Window 10 1607 the default user account picture (which in now semi transparent) is coming from some where else. Any thoughts on how to accomplish this?
If you create a picture in the “User Account Pictures”, that should override it. What I would try, would be creating a new picture that is completely transparent, so it’s basically nothing, name it user.png and see if that works. You’ll need to use that to replace all of the user-X.png files, but I’d assume it would work ok.
I gave it a try. I created a completely transparent picture using GIMP. Saved as user.png. Replaced all user-X.png files and on the login screen I still get the gray default user picture. I am convinced that the user picture on the login screen in 1607 is no longer sourced from here: %SystemDrive%\ProgramData\Microsoft\User Account Pictures.
Nice suggestion though. Thank you for your response.
Hi Michael T,
By Any Chance – did you find out, where the User Account Pictures come from now?
I’d love to set up some user accounts post-install in the MDT task sequence and assign them fitting account pictures. It’s really frustrating that there doesn’t seem to be a method to do this…
Thomas
We were able to get it to work, after adding the registry key (if not using Group policy) and coping the files. I’ve updated the post with the required information to make the pictures work.
UserPictures (This will replace the default user.png file with whatever corporate one you want)
Note, this requires GPO to be set:
Computer Configuration > Administrative Templates > Control Panel > User Accounts.
Double-click Apply the default user logon picture to all users, and enable this setting. Click OK/Apply and Exit
Or, set a registry Key:
HKEY_LOCAL_MACHINE\SOFTWARE\Microsoft\Windows\CurrentVersion\Policies\Explorer
In the right panel, right click and select New > DWORD (32-bit) Value. Give it name UseDefaultTile.
Click on Modify. Enter Value data as 1 for this DWORD (32-bit) and hit OK. A new registry enter will be added.
Are you setting the homepage for IE and edge in your OSD process? If so, how are you accomplishing that?
Edge is Group Policy – Which you can then just made the Registry Keys during OSD
[HKEY_LOCAL_MACHINE\SOFTWARE\WOW6432Node\Policies\Microsoft\MicrosoftEdge\Internet Settings]
“ProvisionedHomePages”=”http://www.google.com/”
[HKEY_LOCAL_MACHINE\SOFTWARE\Policies\Microsoft\MicrosoftEdge\Internet Settings]
“ProvisionedHomePages”=”http://www.google.com/”
IE = unattend.xml – Search for:
component name=”Microsoft-Windows-IE-InternetExplorer”
Pinning IE to the start menu is easy, but requires one minor modification to its .lnk location.
I ran into the same issue but was required to make it pinned to the start menu for my organization.
The IE shortcut is located inside the Windows Accessories folder and for some unknown reason, Windows does not allow this folder to be parsed during the start menu creation even though it is referenced inside the exported xml file.
SOLUTION:
Copy the IE shortcut to the Programs folder and then pin it. If you open the start menu and look inside the I you’ll see it has Internet Explorer. Once there it allows pinning.
Try it.
I really appreciate your work. I implemented the MyComputerDesktopIcon section, but I was surprised when the icon showed up as “This PC” instead of “My Computer”. Is there a way to change that during OSD?
“This PC” was the replacement name by Microsoft starting in Windows 8.1. It’s built into the system as the default. Yes, you can change it, it requires a few extra steps.
You’ll need to update this key: Computer\HKEY_CLASSES_ROOT\CLSID\{20D04FE0-3AEA-1069-A2D8-08002B30309D} – I talk about it a bit in this Post: https://garytown.com/windows-10-customizations-during-osd
Go down to section: MyComputerNameIcon (Changes the Name of “My Computer” to the actual name of the PC)
– On a machine, update the key and see if it gives you the desired results, then export it so you can import it during OSD.
Are the scripts available to download? looking for lock screen command to change our lock screen since we cant do it through gpo with new versions of win10 pro
your best bet is to replace the default files. You can download the TS modules here: https://garytown.com/configmgr-task-sequence-collection or read about it and look at a script that contains the syntax here:https://garytown.com/win10-build-updates-persistent-tweaks
The script used to change Wallpaper doesn’t work as wanted for me (W10 1709).
The default wallpapers are correctly removed and mine is copied. But on first boot, it’s still the default one which is displayed .. Even with another reboot.
Otherwise, in the personnalize menu, i only see my wallpaper, but it doesn’t apply automatically.
Have you already encountered this issue ? How can I resolve it ?
Thanks
Sorry for Delay, been a busy month. To confirm, you’re overwriting img100.jpg and img105.jpg, and this is for the lockscreen, or is this for the desktop backaround (img0.jpg)?
Great article! I’m stuck on trying add\create a shortcut for IE11 on the desktop as part of the MDT imaging process. Is there a way to so that? This is for WIN10 1709.
I’d assume it would work the same as in CM. I have a run command line step that copies the link from package folder (which contains a subfolder called IEIcon which has the Internet Explorer link file) into the desktop: xcopy “IEIcon\*.lnk” C:\Users\Public\Desktop” /Q /Y /I
Hello Gary, what about 1803 and your section ‘DefaultAppAssoc’? It isn’t working anymore I see 🙁 Make Adobe the default pdf reader and set IE as default browser
Windows 1803 update – would you know the sequence of installation and what the last process is before the install is complete? is there a way to find out what the last install is? needed for some testing and I’m stuck as to how I would find out. couldn’t find any KB articles on this
thank you
Not sure what you’re asking for, are you asking about Windows 10 in place upgrades, and what the Windows 10 Upgrade process does? If so, check out: https://docs.microsoft.com/en-us/windows/deployment/upgrade/troubleshoot-upgrade-errors
there is a nice graphic that explains the entire process.
Still a great guide Gary!
Is the fix Outlook search still applicable and also for Office 365 ProPlus or based on Windows only?
This is an AMAZING, comprehensive guide to configs one might want to make, providing plenty of information to empower one to do so. This is one of the best references on the next in the Win10 era. Thanks so much!!!