If you use MDT, then you’re familiar with their use of changing the background and adding system information during the OSD process. This is pretty handy to get some basic info, but with a little tweaking, you can add additional data that can be very useful to make visible during OSD.
Basics, the required files used during this process are stored here: MDT Package\Tools\x64 & x86
It currently comes with old version of bginfo 4.20, the current version when writing this is 4.25. I replace the ones that come bundled with the updated version. Download BGInfo
In the x86 folder is where the templates and images files are located. This will also be the folder you add your custom .vbs files, but we’ll get to that later.

the .BGI files are the bginfo “database” files that contain the template information (layout, options, background choice). The .BMP files are the images referenced in the .BGI files. The image files are 800×600, so they can look fuzzy on high-res screens. This image below is STEP_02.BMP (referenced by STEP_02.BGI) – Called during “Set Status 2” Step in a MDT enabled Task Sequence.

Bginfo then overlays additional information:
This image below is pretty close to the default, after adding 2 of the items Mike Terrill blogged about, and one additional Item based on a TS Variable.

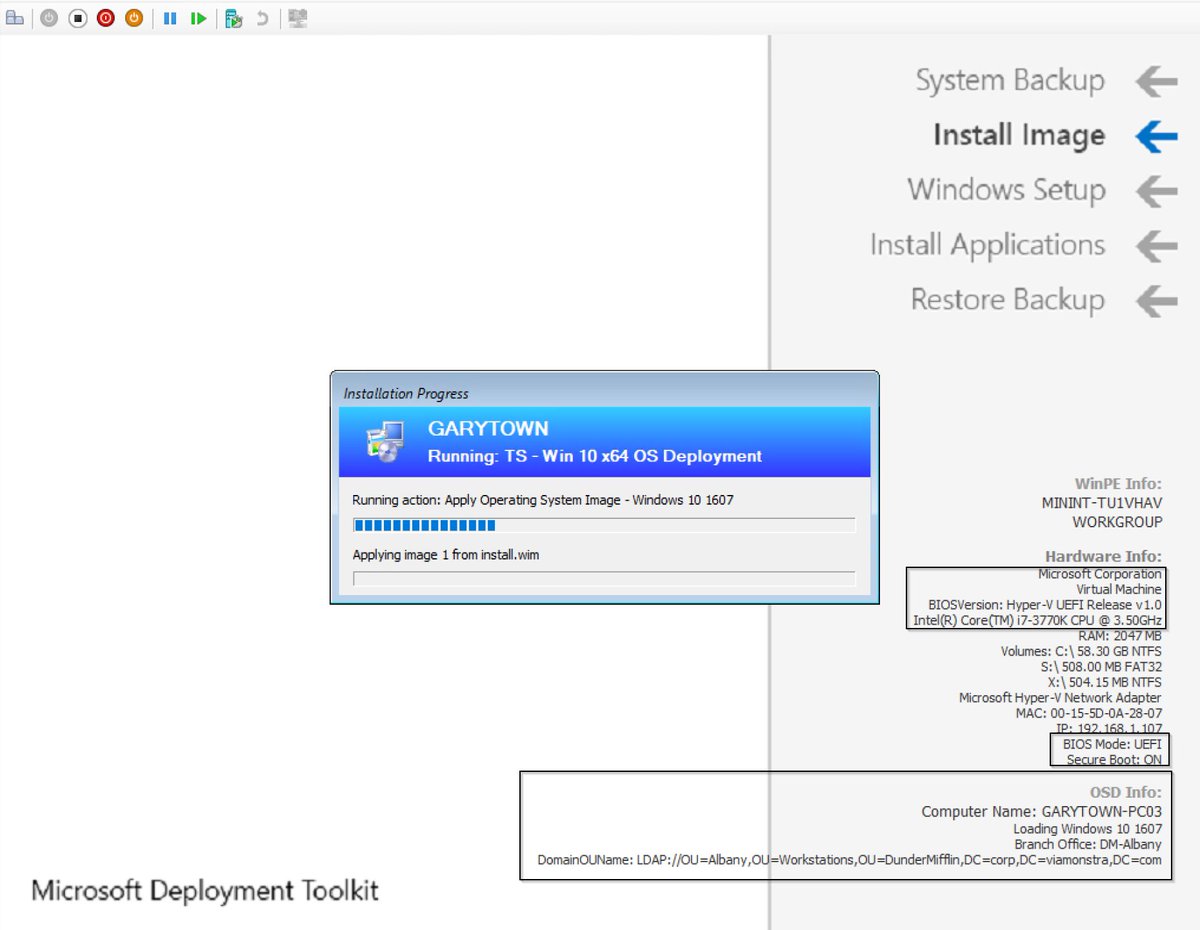
Here is my current template after a few additional modifications, which I go into more detail below.

Following Mike’s blog, I added the BIOS Mode & Secure Boot Fields, as well as the Make & Model information (WQL Query), pulled directly from his post. I then proceeded to add Processor Model & BIOS version, then several TS Variables.
Make sure you’ve downloaded the updated bginfo.exe files and place them into their corresponding MDT folders (x86 & x64). Then on the x86 folder (even if on x64 machine), open bginfo.exe
At this point in the reading, you have hopefully stopped and read Mike’s blog, as I don’t want to completely plagiarize, and this will be pretty similar.

(Sorry, the default fonts are hard to see against the default black background)
Once you launch the tool, go ahead and open STEP_02.BGI file in the x86 folder.
If you click on “Background” you’ll see the name of the background file that is associated with the template: Step_02.bmp, which is located in the same x86 folder, as shown in the earlier pictures.

At this point you can start to modify to get it how you like. Mine now looks like this: (Keep reading, I’ll get to the Custom Fields)
I broke it into a few categories, WinPE info, which is the current OS when STEP_02 runs, so the commands are being run against the WinPE image. This is why you get a MININT-XXXXXX computer name and no workgroup, as WinPE isn’t in your domain, and auto generates the computer name.
I then broke out hardware info about the physical machine into it’s own area, which includes additional built in options, and a few additional vbs scripts.
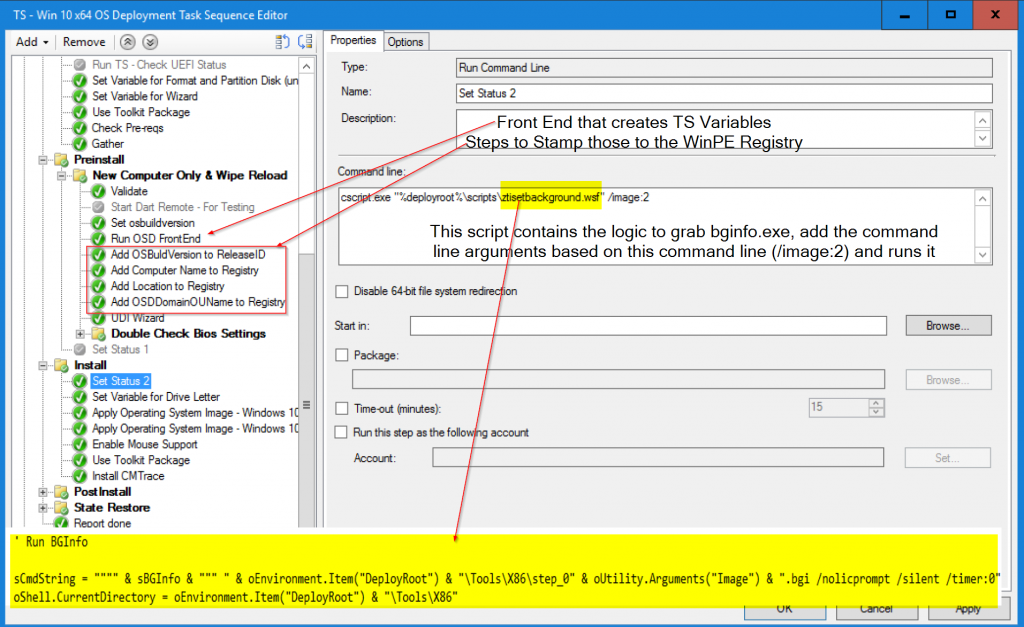
Finally, pulling in OSD information from the TS that is running. To achieve this, in the TS, I write those items to the WinPE registry, so I can easily harvest it from bginfo. Since it’s written to the WinPE registry, it’s only temporary, and you don’t need to worry about cleaning it up later, it goes away after the reboot.

To add fields, click “Custom” right under the fields list.
Click New…
Choose the method to pull your info, in the example I’m using WMI Query to get the BIOS version.
Here are a few example WMI Queries: Note, WMIExplorer was really handy to dig around and find information that I wanted to display.
BIOS Version:
SELECT SMBIOSBIOSVersion FROM Win32_bios

Manufacturer:
SELECT Manufacturer FROM Win32_ComputerSystem

Model:
SELECT Model FROM Win32_ComputerSystem

Processor Model:
SELECT Name FROM Win32_Processor
.VBS Files (must all be placed in the x86 folder, even if using x64, place them in the x86 folder)
NOTE, the .vbs files do not work if you try to run it from the command prompt, but they do work in bginfo. If you want to test the scripts, replace echo with wscript.echo, then remove the wscript before using in bginfo. Don’t ask me, it’s just the way it is.

Here are the .vbs scripts used. I heard Mike will be updating the ones he posted, the ones below are the original. They work fine in PE, and that was good enough for me, I don’t need them to be fancy. If you want to clean them up, be my guest, I basically found a template thanks to google and slightly modified to fit my needs. Please don’t judge me based on the beauty of the scripts I post.
BIOSMode (From Mike Terrill – UEFI or Legacy)
Const HKEY_LOCAL_MACHINE  = &H80000002
strComputer = "."
hDefKey = HKEY_LOCAL_MACHINE
strKeyPath = "SYSTEM\CurrentControlSet\Control\SecureBoot\State"
Set oReg = GetObject("winmgmts:{impersonationLevel=impersonate}!\\" & strComputer & "\root\default:StdRegProv")

If oReg.EnumKey(hDefKey, strKeyPath, arrSubKeys) = 0 Then
  echo "UEFI"
Else
  echo "BIOS"
End If
Drive (C: Drive Space)
Const HARD_DISK = 3

strComputer = "."

Set objWMIService = GetObject("winmgmts:" _
   & "{impersonationLevel=impersonate}!\\" & strComputer & "\root\cimv2")

Set colDisks = objWMIService.ExecQuery _
   ("Select * from Win32_LogicalDisk Where DeviceID = 'C:'")

For Each objDisk in colDisks
   sizeGB = FormatNumber(objDisk.Size /(1024^3), 0 )
   Echo sizeGB
Next
SecureBoot (From Mike Terrill – Enabled or Not)
Const HKEY_LOCAL_MACHINE = &H80000002
strComputer = "."
hDefKey = HKEY_LOCAL_MACHINE
Set oReg = GetObject("winmgmts:{impersonationLevel=impersonate}!\\" & strComputer & "\root\default:StdRegProv")
strKeyPath = "SYSTEM\CurrentControlSet\Control\SecureBoot\State"
strValueName = "UEFISecureBootEnabled"
oReg.GetDWORDValue hDefKey,strKeyPath,strValueName,dwValue

If dwValue = 0 Then
	Echo "OFF"
ElseIf dwValue = 1 Then
	Echo "ON"
Else
	Echo "NA"
End If
VolumeFree (C: Drive – Free Space)
Const HARD_DISK = 3

strComputer = "."

Set objWMIService = GetObject("winmgmts:" _
   & "{impersonationLevel=impersonate}!\\" & strComputer & "\root\cimv2")

Set colDisks = objWMIService.ExecQuery _
   ("Select * from Win32_LogicalDisk Where DeviceID = 'C:'")

For Each objDisk in colDisks
   sizeGB = FormatNumber(objDisk.FreeSpace /(1024^3), 0 )
   Echo sizeGB
Next
Registry, these were keys I created during the TS by stamping TS Variables to Key Values.

These are stamped to the WinPE registry, as that is the OS running when this is displaying. In my TS, I don’t have any additional BGinfo / Images display once it’s out of PE, after that’s it’s finishing the OSD with the windows setup black screen, so I only needed this info to display during the WinPE stage, which made writing it to the registry the perfect solution for my purposes.
OSD Computer Name - What you're naming the PC you're Imaging:
REG ADD "HKLM\SOFTWARE\GARYTOWN" /V ComputerName /T REG_SZ /D "%OSDComputerName%" /F

OSDDomainOUName - OU It's Being Image into:
REG ADD "HKLM\SOFTWARE\GARYTOWN" /V OSDDomainOUName /T REG_SZ /D %OSDDomainOUName% /F

OSBuildVersion - Custom Variable that is the Build of Windows I'm deploying:
REG ADD "HKLM\SOFTWARE\Microsoft\Windows NT\CurrentVersion" /V ReleaseID /T REG_SZ /D %osbuildversion% /F
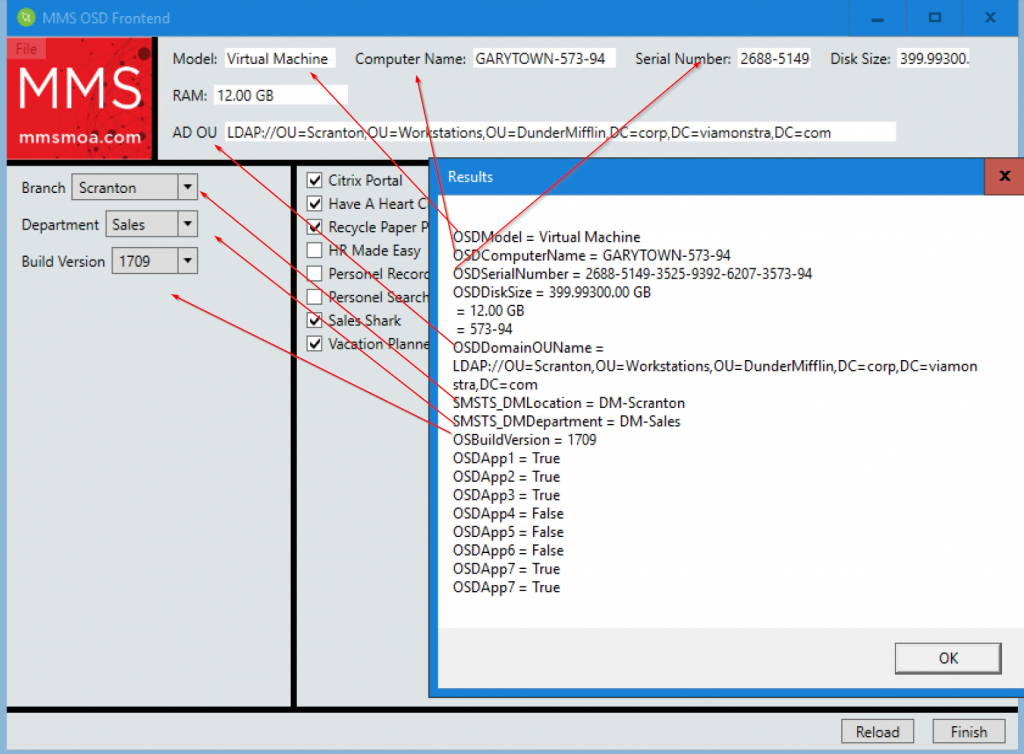
The Variables are set using a FrontEnd or Collection Variables. I use the Now Micro front end in my lab. Link HERE, scroll down to the FrontEnd Link. The AD OU is a direct relation to the “Branch” Chosen and auto populated. In this front end, everything in the top area is auto generated based on Queries, or other imput, the only field that can be modifed is teh Computer Name, either leave the auto generated one, or modify for the deployment. If doing a “Refresh” all of the variables are set on my collections, %OSDComputerName% is the name the computer already has, so the settings (variables) would be reapplied automatically during a Reimage with no need for the front end. This is just an example, basically you can put anything you want into BGInfo, just need to be a little creative.

Note, if you’re creating variables and registry keys to use in BGInfo, I know this seems obvious, but make sure you run the steps to create the variables and keys before you run the step for BGInfo! (Set Status 2 – Which is a native MDT Step auto generated) The Step is calling the ztibackground.wsf file, which gathers information (architecture, etc) uses that to call the correct version of bginfo (x86 or x64) then pull the additional files (templates, Images, scripts) from the x86 folder, even on x64 machines.

Once you’ve added all of your Custom Fields, you can then add them into your bginfo template, and play around with that, it’s basically like working with wordpad from windows 95.
Once you have your desired layout, save the template and overwrite the default. Then update the MDT Package in ConfigMgr.
BGInfo Background Template (7422 downloads ) is my Template File & VBS files, over write the ones in the x86 folder.
Coming up next, taking this and applying it to in-place upgrade.
Please comment with additional .vbs scripts or things you’ve found handy to add. Feedback is always welcome.


Older, but related: https://channel9.msdn.com/Events/MMS/2012/CD-B310
Thanks for the Link!
Gary the template files referred to at the end of the post appear to be broken from this page. Are you able to re-add them?
Updated page to make link for download more noticeable.
Gray, I`ve added the step Use Toolkit package with BGinfo updated, but the information from BGI steps has not appeared on the screen. Is it correct that BGInfo steps are started via Use Toolkit Package step?
I haven’t used the Toolkit in years, but if I recall, you still have to have a specific step to launch the BGInfo.