Why would you do this? OSD Builder is completely capable of automation, creating scripts that can do all of this, and run via scheduled tasks. So why shoe horn it into a Task Sequence? Task Sequences are very comforting to me. They are powerful, have amazing amounts of flexibility, they manage the flow of content, easy to deploy and schedule.
DOWNLOAD TS: OSD Builder in a Task Sequence - 2021.03.10 (17273 downloads )
Updated 2021.03.10 – updated to use build task json
Updated 2020.10.27 – changed process to use “Build Media” vs “Update Media”, Old step is still there and disabled for reference, built feel free to check out the new step.
My overall goal was to learn OSD Builder. We’ve used OSD Builder since it’s first release, and it’s become instrumental in our successful WaaS process at BigBank. However my coworker Mike has been the one running OSD Builder and servicing the WIM for our in place upgrade process, and I haven’t had much to do with it.
I’d like to think while I developed this Task Sequence, I met my goal of learning OSD Builder. Once I learned the basics, I kept extending my goal of making the process completely dynamic, each “Sub Group” inside the TS is identical except 1 step where you set variables.
First, let me show you a capture of the the Task Sequence.
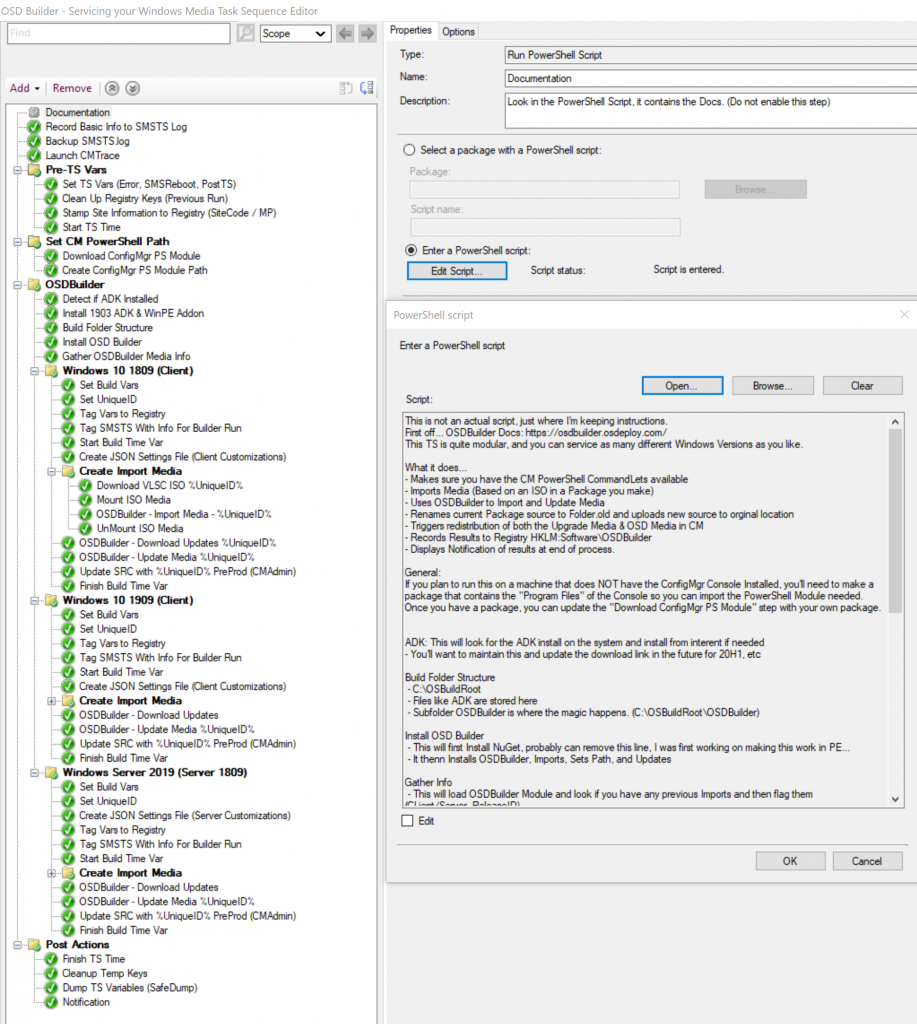
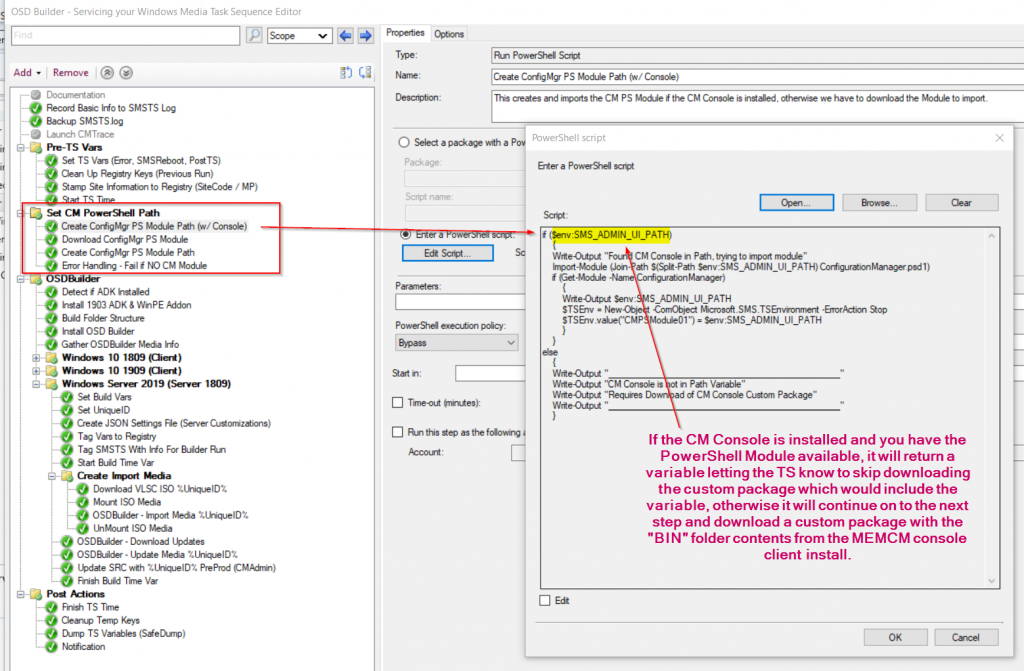
So basically there is a generic session, where we make sure we have the requirements in place to run OSD Builder, then we have a sub section which imports / updates the media.
Pre-Reqs: ADK (Not necessarily needed, but I don’t know what OS you’re running, and I want to make sure and updated DISM is available.) The other Pre-Req, not necessarily for OSD Builder, but for being able to tap into the ConfigMgr environment, is the ConfigMgr Console, or at least the contents of the install so you can import the ConfigMgr Powershell library.
- Documentation: See Image above, it’s step that includes the documentation for the Task Sequence.
- Record Basic Info into the SMSTS Log. Details HERE
- Backup SMSTS log, this renames SMSTS.LOG to append date stamp… it keeps this single run as the only items in the SMSTS Log, completely a preference thing.
- Launch CMTrace, this will launch CMTrace with the SMSTS log so you can watch the progress live
- Pre-TS Vars {Group}
- Set TS Vars: Error Dialog Time, Persist Content, Preserve Content
- Cleanup Registry: Removes Custom OSDBuilder keys from previous run
- Stamp Site Info: This stamps Site Code & MP Info into registry to be used by Scripts
- Start TS Time: Starts the “Timer”
- Set CM PowerShell Path (If CM Console NOT installed) {Group}
- Downloads the CM PowerShell Module
- Creates a Path to the Download and tags in Registry so scripts can find module
- OSDBuilder {Group}
- Detect if ADK Install (Doesn’t look for version)
- Install 1903 ADK (if ADK not detected) – You’ll need to update the URLs for future versions
- Build Folder Structure: Makes sure C:\OSBuildRoot\OSDBuilder is created
- Install OSD Builder: Installs OSD Builder Module and Pre-Req
- Gather OSDBuilder Media: If OSD Builder has been previously run, this looks for previously imported media so it can skip the import process later
- Windows Media Update {Group}
- Set Build Var: this is the main step you need to modify per Media Update.
- Set Unique ID: This is the unique identifier for this build
- Tag Vars to Registry: Tags info to registry to be used in reporting later
- Tag SMSTS with Info: Helps to separate builds in the SMSTS Log
- Start Build Time Var (Starts the Timer for this Build)
- Create JSON File (Creates the JSON File that OSDBuilder will use)_
- Create Import Media {Group} Only runs if no Imported Media already exist
- Download VLSC ISO: Downloads a Package YOU Created which contains the ISO
- Mount ISO Media
- OSDBuilder – Import Media: Triggers OSDBuilder to import the specified Media.
- Unmount ISO
- OSDBuilder – Download Updates: Downloads MS Update for Build
- OSDBuilder – Update Media: Updates the Media
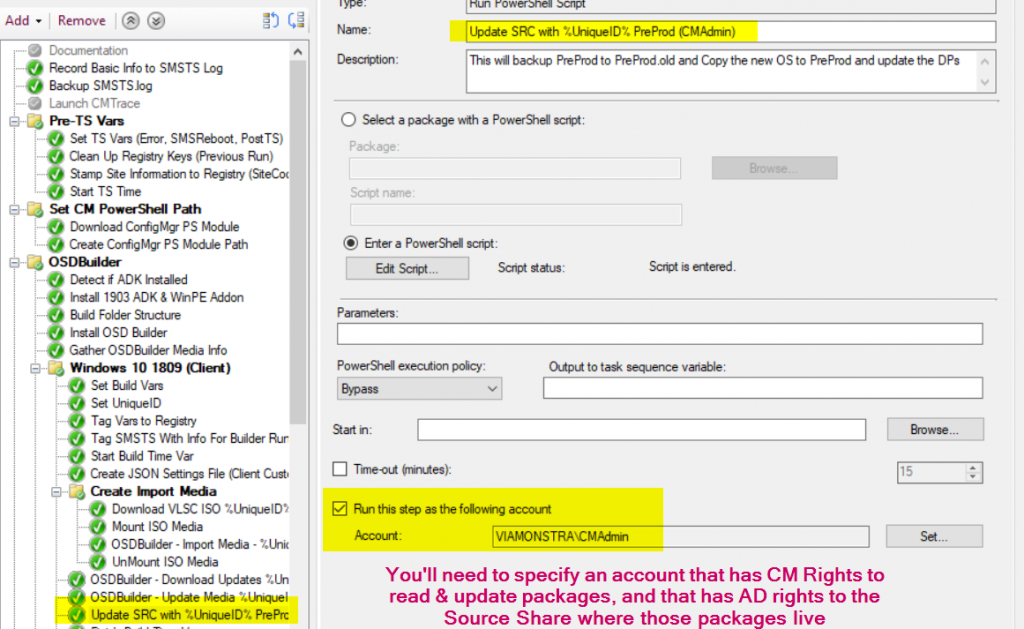
- Update SRC with Media: This copies the content from the build machine to the server (replacing the contents of the packages specified), then bumping the content and updating the Package Info. This step will also WAIT until the package content source version has incremented as well.
- Finish Build Time: Stops the Timer
- Post Actions {Group}
- Finish TS Time: Stops TS Timer for entire process
- Cleanup Temp Keys: Deletes Keys not needed for reporting, but were needed along the way to keep track of builds
- Dump TS Vars, mostly used during troubleshooting
- Notification, Creates the “Error” Dialog box with the “report” for the run.
Set Build Vars Examples:


Example of the “Tag SMSTS with Info for Build”

Example of JSON File Created during TS

Packages:
- ISO Media: This Package contains the ISO file, that’s it. See image below.
- Windows Media in CM
- Upgrade Package: This Media extracted from an ISO for the Upgrade Process
- Ex: \\src\src$\WinMedia\1909_PreProduction\*
- OSD Package: This is the WIM file located in the sources file of the Upgrade Media
- Ex: \\src\src$\WinMedia\1909_PreProduction\sources\install.wim
- Upgrade Package: This Media extracted from an ISO for the Upgrade Process
- By using the install.wim file that part of your upgrade package, this ensures that you’re using the exact same WIM for both OSD & IPU, keeping your environment consistent.
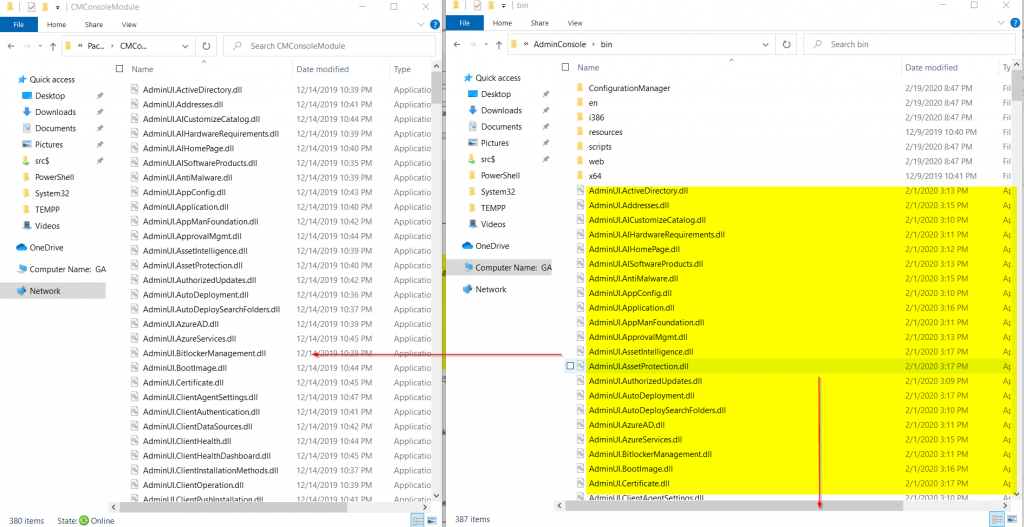
- CMConsoleModule… this is a really ugly package. It’s a file copy of the BIN folder of the CM Client Console Located: C:\Program Files (x86)\Microsoft Endpoint Manager\AdminConsole\bin
- Script on GitHub to run on a machine with the Console to copy the required files to a UNC Path for you to create your Package From
- Blog Post with more info: ConfigMgr PowerShell Module


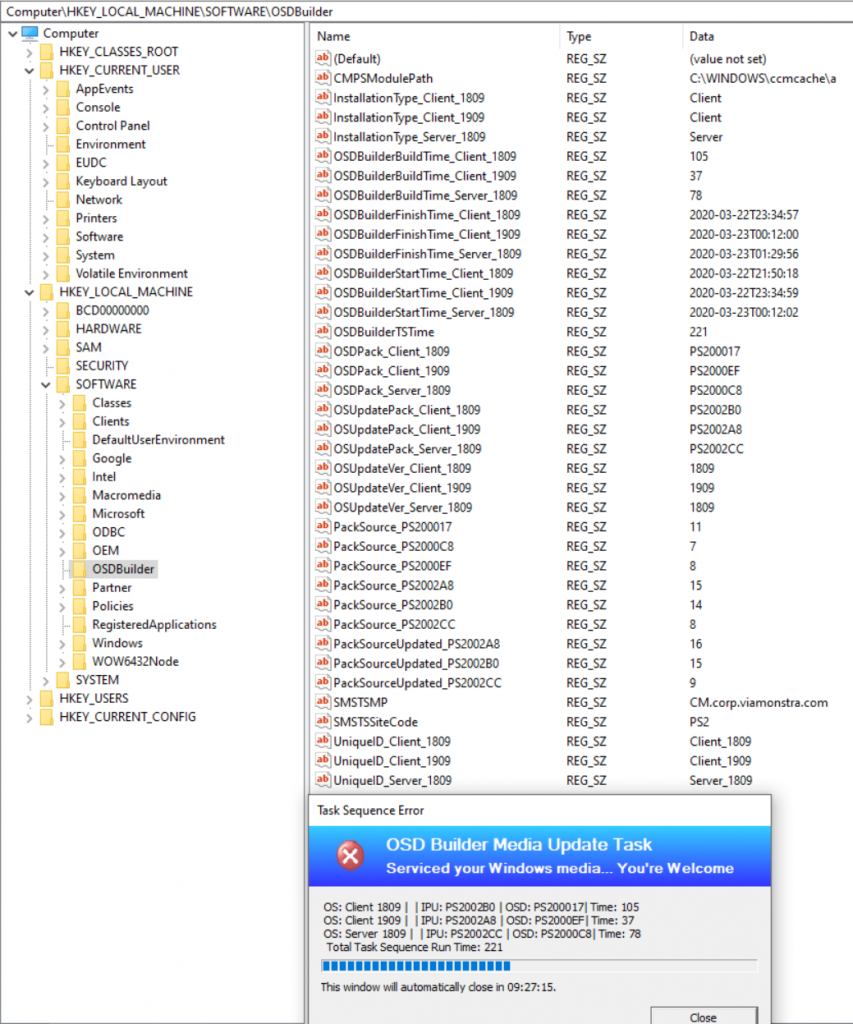
Registry Keys are used for calculating the totals for the “Report” Dialog. The “Source” Keys keep track of the Package Version Source, so the TS knows when the Packages successfully update their Content Versions.
Video, hosted on YouTube. Times: First 30 Minutes is me talking about what is going on in the Process and going over the TS. The next 30 minutes is the video in 8x speed watching logs… then at 1:03:15, it’s me going over the results again.
Easter Egg….
The version field in the Console is populated by picking a random “Holiday” for the day you ran OSDBuilder TS… I apologize now if anything is ever questionable. I didn’t look through the entire calendar, but what I saw seemed safe for work: https://www.checkiday.com/
RSS Feed used in Powershell: https://www.checkiday.com/rss.php?tz=America/Chicago
Thanks for sharing! Love it!
Hi,
First of all thanks for this amazing TS, it’s going to help us a lot
I’ve been trying to implement it in my environment with no succes. A think it’s working the most of steps, but the group … “Set CM PowerShell Path” it seems doesn’t work properly for me. The WMI query evaluation crashes and is always evaluated as “FALSE”, so I had to delete it, after that the “group” was processed and PS Module donwloaded, (I have the console already installed where I’m running the TS) … registry Keys are filled and process continues … all works fine from this point … until I reach … “Update SRC with %UniqueID% PreProd (CMAdmin)” … then crashes when importing PC Module … with a RPC server is unavailable …
I’m sure that the problem is regarding console installation … and PS module … but I don’t know how to handle it
Any help would be appreciated.
Kind regards
This is resolved on any versions 2020.03.31 or newer.
Hey Gary,
So far everything seems to be working for me up until the OSDBuilder -import Media %uniqueID% step.
The .log is saying that the OSMedia isn’t found at d:\Sources\install.wim. The media seems to be mounted to my D drive just fine.
https://i.imgur.com/CMlnAwB.png
https://i.imgur.com/DUrwzqc.png
https://i.imgur.com/zCVRBkK.png
Using the latest 1909 VLSC Windows 10 Enterprise media.
Make sure you have no mounted ISO devices or DVDs in the machine when you start the process.
I love this Gary!!. I do have a question. I work in a closed area and we have no internet access. I am developing my MDT deployment solution. We have internal Domain and network inside these areas. How can I implement this into MDT for use with no SCCM?
This was designed for CM with the assumption that the machine that is running the task sequence has access to the internet to install the required modules, and download the updates.
While you could probably get this to work in MDT with a bit of work, internet is a must.
If you want to give it a test run, I’d recommend downloading the CM Lab Kit from Microsoft, then you can set that up on your personal device in HyperV.
Is this only for updating an existing image in OSD-Builder ?
Or can it be used as an initial run ?
Reason I ask, is that I have extrafiles in contents folder, like adding language files and wallpapers with scripts to remove the existings wallpapers.
Can I just add the following to the generated json file?
“ContentPacks”: [
“MultiLand DK”
],
“ExtraFiles”: [
“ExtraFiles\\Windows 10 Wallpaper”
],
“Scripts”: [
“Scripts\\Global Remove-4kWallpaper.ps1”
]
I would also need to push the files in the right folders if OSBBuilder is just installed.
It can be for either, you’ll need to update the JSON files in the JSON steps in the TS to point to your OSDBuilder folder, and check the steps along the way, I think I specify a specific folder.
So either, run TS and use the new structure that it creates, porting your stuff over, or update the TS to use your locations.
Hi Gary, thanks for this great task sequence, I am a little confused on the packages, in your video you mention the upgrade package and the OSD image. However on your site you mention-
ISO Media: This Package contains the ISO file, that’s it. See image below.
Windows Media in CM
Upgrade Package: This Media extracted from an ISO for the Upgrade Process
Ex: \\src\src$\WinMedia\1909_PreProduction\*
OSD Package: This is the WIM file located in the sources file of the Upgrade Media
Ex: \\src\src$\WinMedia\1909_PreProduction\sources\install.wim
Can you elaberate more as this is where its failing for me.
cheers Dene
ISO file = Import Media. [Input]
OSD & IPU Packages get updated by OSDBuilder [Output]
thanks Gary
Gary, I’ve followed your configmgr-powershell-module-package blog I see in the logs the Module successfully imports. But then the TS Fails out because it can’t create a new-PSDrive.
Error: New-PSDrive : The RPC server is unavailable. What might I be missing?
Then after I wrote this and waited to post, I tested manually outside of the failed TS; the command wouldn’t work with https:// but worked without, why would that be if my PrimSite is configured with HTTPS
Sorry, I honestly don’t know. My Lab is HTTP and I haven’t tested in HTTPS only site.
I had the same issue and I was able to fix it by adding below.
if($ProviderMachineName -like “http*”){ $ProviderMachineName= ($ProviderMachineName).Split(‘/’)[2]}
Need to add before below lines:
if (!(Get-PSDrive -Name $SiteCode -ErrorAction SilentlyContinue)){New-PSDrive -PSProvider CMSite -Name $SiteCode -Root $ProviderMachineName}
Trying to run the OSBuilder servicing OSD and constant getting this error.
Coping Updated Media from OSBuilder to Source Server Pre-Prod Location for 1809
Rename-Item : Cannot bind argument to parameter ‘Path’ because it is null.
\WINDOWS\TEMP\SMSTSPowerShellScripts\{22262160-45E8-4B73-B606-686F1CCAB97C}.PS1:73 char:17
+ Rename-Item $UpgradePackage.PkgSourcePath “$($UpgradePackage.PkgS …
Update-CMDistributionPoint : Cannot bind argument to parameter ‘InputObject’ because it is null.
Set-CMOperatingSystemInstaller : Cannot bind argument to parameter ‘Id’ because it is null.
they going to “Orginal Package Source: , Currently: ” and just spamming this message untill i kill the task
any idea ? 🙂
Sounds like the account you’re using to run the step can’t access that folder location. Can you confirm that the account you’re using has both rights to CM Console objects and the File Path you’re storing the source files?
Hello Gary,
With OSD Builder in a Task Sequence – 2020.10.27 you added a step Pause – Command Prompt. What is the purpose for the command prompt pops up?
Thanks,
Hoang
Sorry, I didn’t notice that until after I had already uploaded.
I’ve uploaded a new copy to night which includes a fix for if you have several builds too.
I had to make 2 changes to make it work in my environment.
1. Change the security protocol to TLS 1.2 before it first time tries to download the OSDBuilder module.
https://devblogs.microsoft.com/powershell/powershell-gallery-tls-support/
2. My environment is running in HTTPS and when it was trying to connect PS-Drive it was failing because it was using https://FQDN instead of FQDN so I have add a command to remove the HTTPS
if($ProviderMachineName -like “http*”){ $ProviderMachineName= ($ProviderMachineName).Split(‘/’)[2]}
if (!(Get-PSDrive -Name $SiteCode -ErrorAction SilentlyContinue)){New-PSDrive -PSProvider CMSite -Name $SiteCode -Root $ProviderMachineName}
Thank you for sharing. I’ll add these enhancements to a future release.
Thank you for all the work you do that makes my life so much easier!
It looks like the ReleaseID displayed in OSDBuilder changed from 2009 to 20H2 at some point. Took me a while to figure out why my build wasn’t working… Just thought I’d mention it as the TS download listed as 2009.