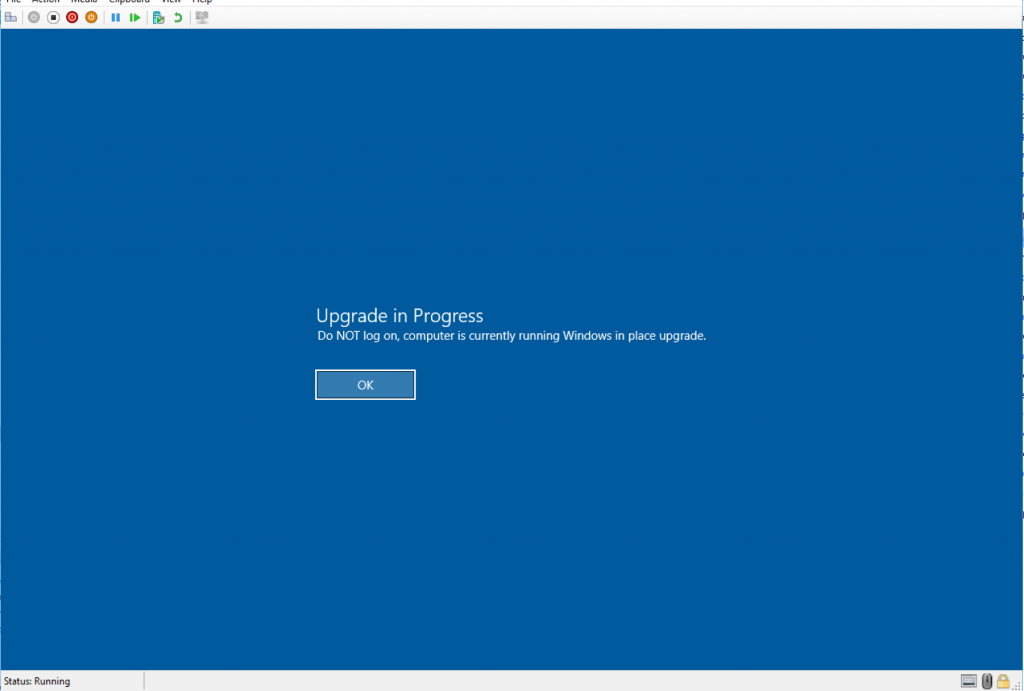
Update 2017.10.26 – After a twitter convo with @brookspeppin, I added two additional steps for the legal notice. I had ones to delete them, but Brooks said he had used them as the upgrade message, skipping everything else. This was something I had considered, but after talking it over with the team, decided against it “No one reads that”, but after seeing Brooks’ screen capture, I tend to agree that it’s worth having in your pocket, so I’ve added it to the Task Sequence Export that’s available to download. Here is a screen capture and keys needed.
REG ADD "HKEY_LOCAL_MACHINE\Software\Microsoft\Windows\CurrentVersion\Policies\System" /v legalnoticecaption /T REG_SZ /D "Upgrade in Progress" /F
REG ADD "HKEY_LOCAL_MACHINE\Software\Microsoft\Windows\CurrentVersion\Policies\System" /v legalnoticetext /T REG_SZ /D "Do NOT log on, computer is currently running Windows in place upgrade." /F
Update: 2017.09.26 – Was able to take advantage of local group policy bypassing the need to talk with your Group Policy Team. You can do it all in the TS.. Go to bottom to see how..
– Updated info again on 2017.10.13 here (includes updated download): https://garytown.com/configmgr-task-sequence-collection
Original Post: 2017.09.15:
What: Changing the Lock Screen Image to warn end user that the system is performing upgrade, also preventing users from logging on during TS.
Why: So users don’t call upset when they logon to a computer then get rebooted when the TS reaches that point. (For those groups whose users don’t read all of the communications about their machines updating)
How: Downloading Pre-created Images, setting registry keys, and to lock out users, that requires a little help from group policy (1 time setup)
![clip_image001[17] clip_image001[17]](https://garytown.com/wp-content/uploads/2017/09/clip_image00117_thumb.png)
Back story: ProgressUI does not display on computers unless a user is logged on. If the process starts at it’s deadline, and no one is logged on, it will start running the task sequence with no visible signs until it reboots into setup, and the user sees the Windows 10 Setup screen. Lets say the TS has started, and it’s in the middle of downloading the content, which can take awhile on a slow link. User starts to do work (watch cat videos), and then they see a message pop up finally saying “computer will reboot in 60 seconds, you’re welcome”, they won’t be so happy, worse yet, they look away for a couple minutes, or are grabbing their coffee to come back and find their computer rebooting to setup. How can we draw more attention to the fact the computer is doing something.. how about make a bold lock screen image warning the user of the upgrade, or even prevent them from logging on.
Here is a picture, the PC was logged into during the TS, the User has no idea it’s in the setup.exe phase of the TS, going to reboot them in a few minutes. This is what we’re trying to avoid.

Lock Screen is pretty easy, I have a couple steps in the beginning of the TS that downloads the files I need to a local folder, then deletes them at the end.
I have this same process repeated several times, before different large steps. In my Example, I update the Security Software, which takes 20 minutes, so I have a custom lock screen image saying it’s updating Security Software.
I then repeat the process after the Security software is installed, and change the Image to say “Upgrading Windows OS”, which will be there until it reboots into setup. At the end, I delete the registry keys allowing the original settings to take over and original lock screen image to return. (If you’re using the registry keys to apply a custom image, just set it back to what it was before, you could easily capture that key into a variable, then set it back at the end, or manually add it if everyone is the same, or have group policy fix it later)
Please modify steps to fit your environment, file names / location are only for example.
- Make Temp Folder for OSD Stuff
- Copy Background Images (From your package with custom backgrounds)
- Package Contents: – Download Mine HERE

- xcopy OSDImages\*.jpg %programdata%\OSDReqs /Y

- Package Contents: – Download Mine HERE
- Update Lock Screen Image Group (Only set to run if no one is logged on)
- WMI Query: select * from win32_computersystem where username is NULL
- Set Image 1 (Security Apps) – Modify the ImageName to match your needs.
- Tweak – Delete Legal Notice on Logon (1 of 2) –Optional – Removes the Legal Notice
- REG DELETE “HKEY_LOCAL_MACHINE\Software\Microsoft\Windows\CurrentVersion\Policies\System” /v legalnoticecaption /f
- Tweak – Delete Legal Notice on Logon (2 of 2) –Optional – Removes the Legal Notice
- REG DELETE “HKEY_LOCAL_MACHINE\Software\Microsoft\Windows\CurrentVersion\Policies\System” /v legalnoticetext /f
- Stop Process -Name WinLogon (Forces LockScreen to refresh.)
- powershell.exe “if((Get-WmiObject win32_computersystem).username -eq $null) {Stop-Process -Name winlogon -Force -Verbose}”
- Wait 5 seconds – Allows time for the Lockscreen to refresh before continuing. – Optional
- powershell.exe “Start-Sleep -seconds 5”
As for the locking out of users so they can’t log on, here is how I did that in my lab.
I created a group policy called “Deny Logon Locally” – TechNet
- Computer Configuration\Windows Settings\Security Settings\Local Policies\User Rights Assignment
- Set Deny logon Locally to “DenyLogonLocally” (Which is the group we’re going to create in the TS)

During the TS, I create a local group called “DenyLogonLocally” and populate it with all of the users who have logged onto the local computer (Thanks @keithga1) for the powershell code.
- Create Local Group DenyLogonLocally
- net localgroup DenyLogonLocally /add
- Set continue on error (it will error if you already have the group on your machine) – Recommend NOT deleting when done, but leaving for all future upgrades. I had issues when I deleted it and recreated it, the policy didn’t take on the recreated group even with the same name.
![clip_image001[7] clip_image001[7]](https://garytown.com/wp-content/uploads/2017/09/clip_image0017_thumb.png)
- I had considered having an AD Group of all Domain Users (that were not admin accounts), but then you have one more group to keep manage in AD, so I decided against that. – that’s my greyed out step. – Note, added section at the end to show I had did set this up.
- Add Accounts to DenyLogonLocally – This will grab all of the accounts that have logged onto the machine, and populate them into the local group (You can specify accounts you don’t want included)
- Code: (Copy and paste it all, it is just one long line of code, thanks Keith) – Change the -notmatch area with your tech accounts
powershell.exe -NoProfile -ExecutionPolicy ByPass -Command "$Sids = gwmi win32_UserAccount -filter 'LocalAccount = True' | % SID ; gwmi win32_userprofile | % { [Security.Principal.SecurityIdentifier]::new( $_.SID ) } | ? { $_ -notin $Sids -and $_.AccountDomainSID } | % { $_.Translate( [Security.Principal.NTAccount] ).Value } | ? { $_ -notmatch '\\cmadmin' } | % { net.exe localgroup DenyLogonLocally /add $_ }"![clip_image001[21] clip_image001[21]](https://garytown.com/wp-content/uploads/2017/09/clip_image00121_thumb.png)
Here shows the group after the script has run, both accounts garytown & cmadmin have logged on to this machine, but only garytown has been added.
![clip_image001[9] clip_image001[9]](https://garytown.com/wp-content/uploads/2017/09/clip_image0019_thumb.png)
- Code: (Copy and paste it all, it is just one long line of code, thanks Keith) – Change the -notmatch area with your tech accounts
- Remove Deny Logon Locally Group Membership – placed near the end in your clean up section, and in the roll back section, so if the upgrade fails, it will remove the users from that group, allowing them to log on again
Note, do NOT kill the winlogon.exe after the setup.exe phase, bad things happen.. like it stops your TS (No errors thrown).
In the image above, you can see the “Stop Process -Name Winlogon” Step, disable / delete that.
You honestly don’t need it after the setup.exe anyway, rest of the TS will be visible to your users. After you delete the keys and clean up the images, everything will go back to how it was before once the system reboots at the end of the TS.
Hopefully this is helpful for you, not saying it’s the best or only, I’ve seen a lot of people blogging about similar things during an OSD TS, but I haven’t found much for in-place upgrade TS, so I’ve posted this.
NOTE: Sometimes the Lock Screen is buggy not showing the Lock Screen image, I’ve seen this on countless tests, I believe it is a known bug, so hopefully this gets resolved in the future. In my last test, I changed the Background after the setup stage, but it just stayed a solid color blue, didn’t actually load the background. This is why it’s great if you can prevent logon until the TS is complete.
I’ve also been considering removing the default “Upgrade Operating System” step with a run command line step and remove the /quiet switch. If we don’t want users logged on, then having the UI display will assist with getting them to no be logged on, right? Well, I still have to test this idea, if it pans out, I’ll share.
Updated 9/18 to show adding a domain group to control lock out.
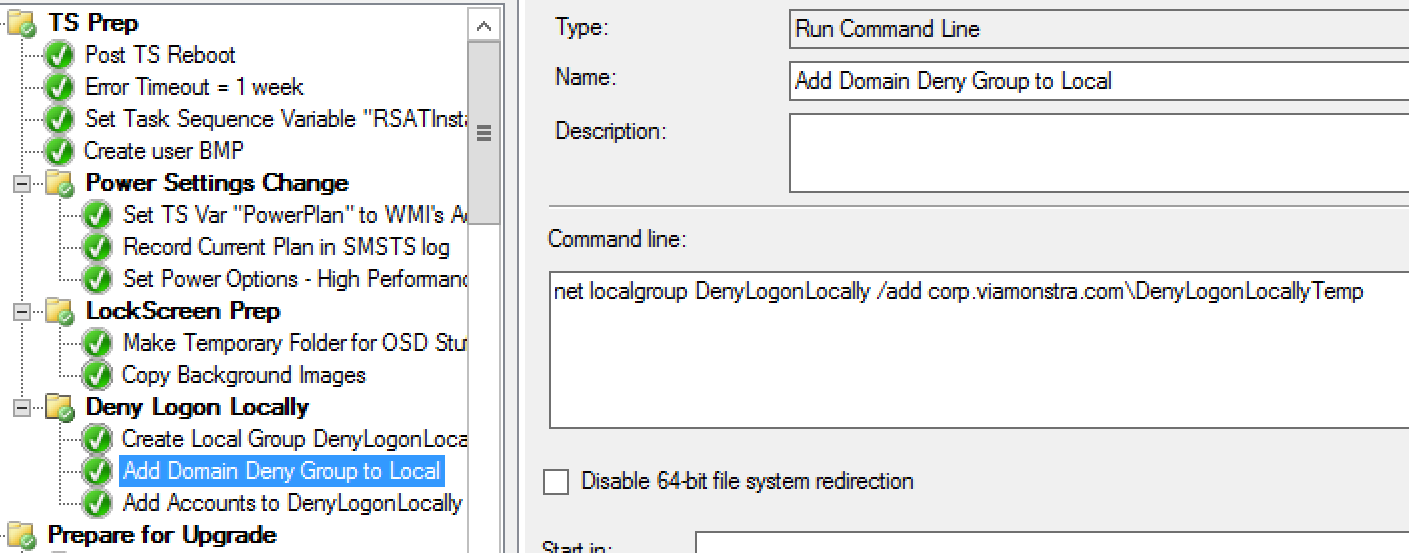
In Active Directory, I created a group “DenyLogonLocallyTemp” and added all of the user accounts that I want to deny access. This is where nested groups would be best. Just make sure you don’t have any of the tech / admin accounts in any of those groups.
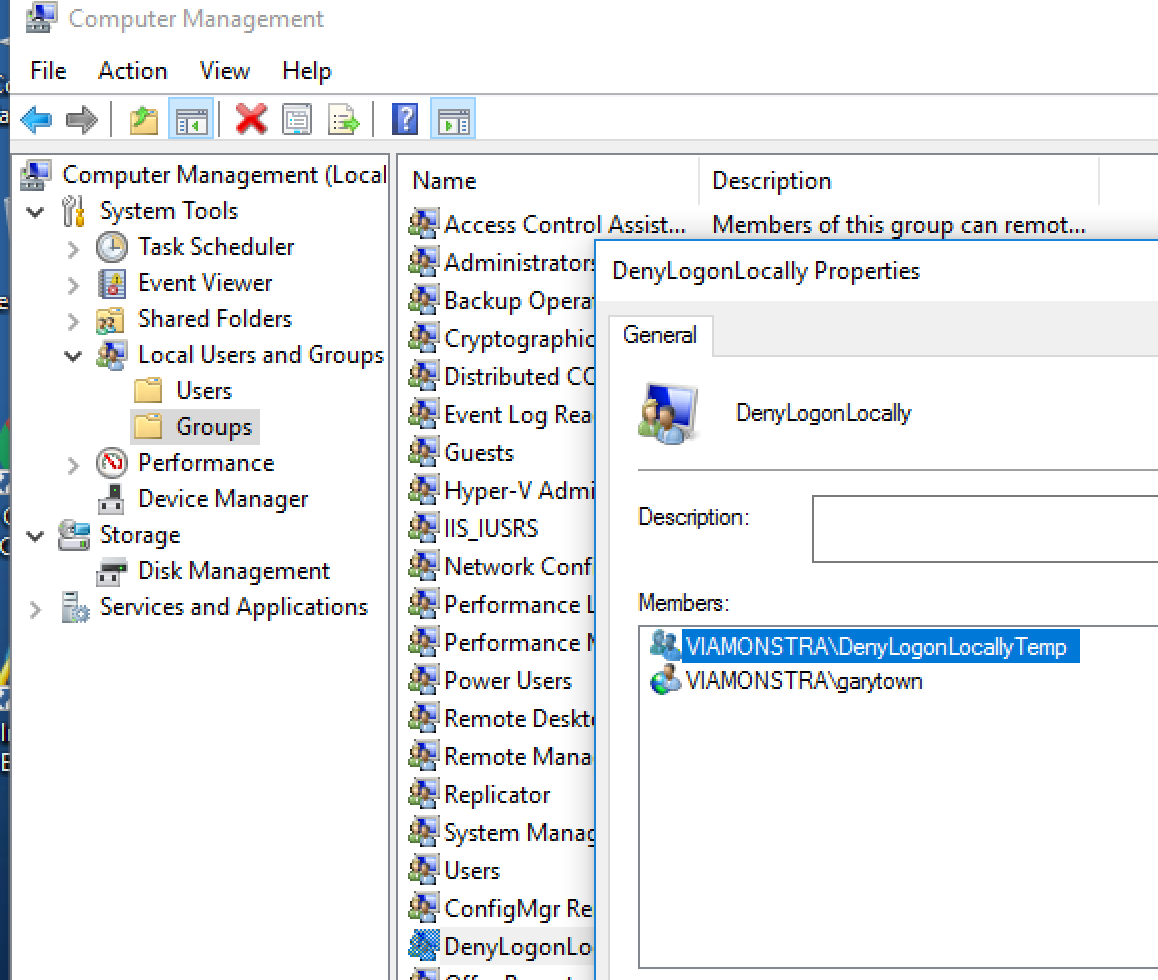
Above shows the Machine after the steps “Add Domain Deny Group to Local” & “Add Accounts to DenyLogonLocally” have both run. The Domain group was added by the first step, and the individual user by the second. This is for demo purposes, you can pick one or the other, or both, depending on your scenarios.
Step: net localgroup DenyLogonLocally / add DOMAIN\DenyLogonLocallyTemp
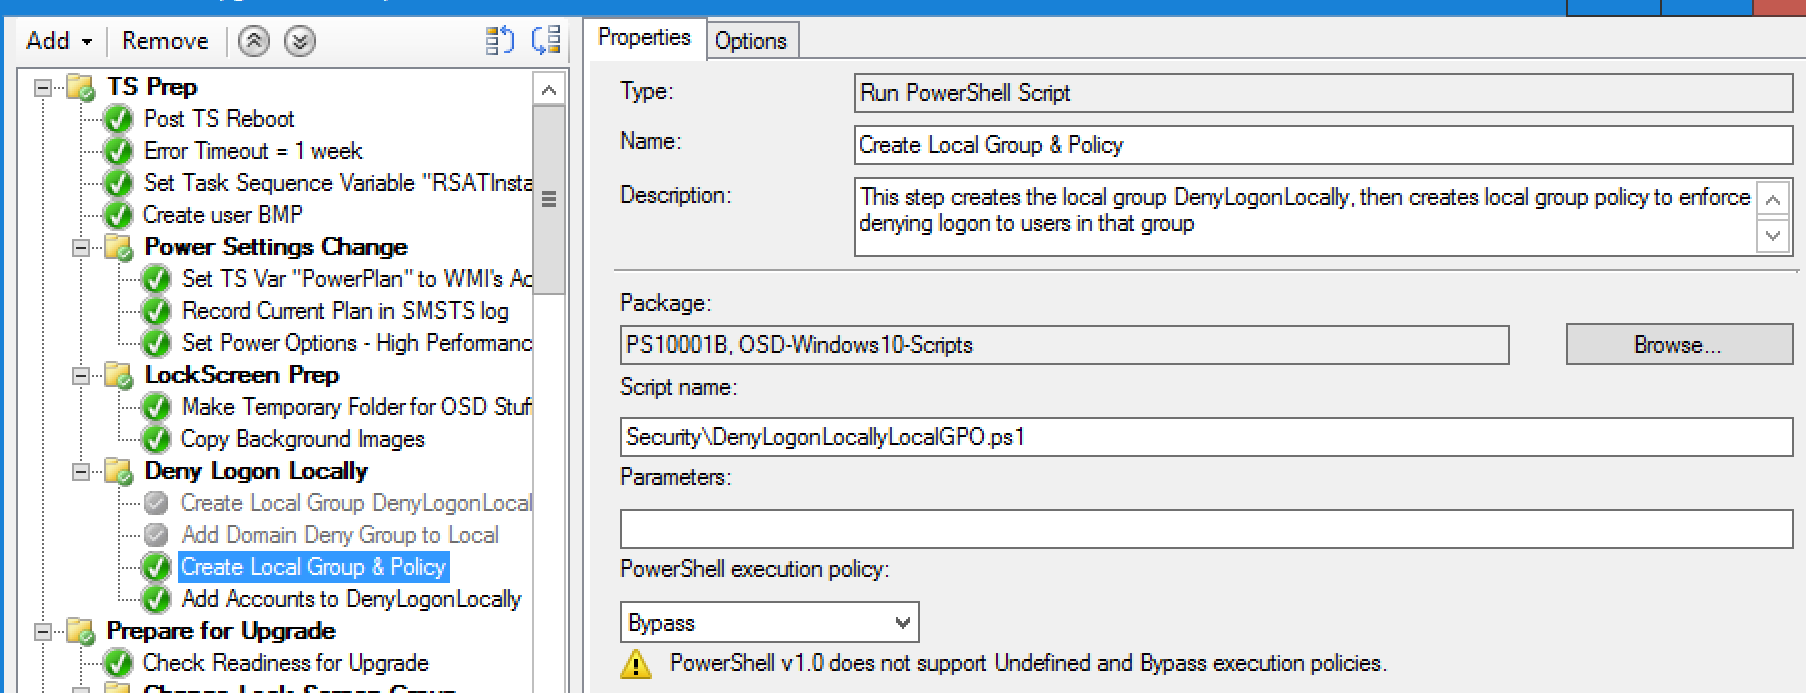
Update 2017.09.26 – Update to use Local Group Policy:
using secedit.exe, we can import an inf file for this policy. The issue I had run into, secedit uses the SID of the user group, not the display name, and if you make a local account, the SID will be different on each machine, so I need a way to dynamically update the inf file with the correct SID. So I came up with the idea of having a script that would create the local group, grab the SID, build the inf file from scratch, and use the SID of the newly created group. Then the script runs secedit with the contents of the inf file. (Thanks to Keith again for the assist on creating the Code).
Replace Create Local Group DenyLogonLocally with a new PowerShell Script Step:

[cmdletbinding()]
param(
    $LocalGroupName = 'DenyLogonLocally',
    $RightToRemove = 'SeDenyInteractiveLogonRight'
)

Net LocalGroup /add $LocalGroupName

$GroupSID = Get-LocalGroup -Name $LocalGroupName | % SID | % Value

$tempFile = [io.path]::GetRandomFileName() + ".inf"

@"
[Unicode]
Unicode=yes
[Version]
signature="`$CHICAGO`$"
Revision=1
[Privilege Rights]
SeDenyInteractiveLogonRight = *$GroupSID
"@ | out-file -FilePath $tempFile -Encoding unicode


secedit.exe /configure /db "$($LocalGroupName).sdb" /cfg $tempFile
# it would be a good idea to redirect the output from this program to a log

# remove-item -Path $tempFile
Condensed Video of Progress:


![clip_image001[15] clip_image001[15]](https://garytown.com/wp-content/uploads/2017/09/clip_image00115_thumb.png)


![clip_image001[23] clip_image001[23]](https://garytown.com/wp-content/uploads/2017/09/clip_image00123_thumb.png)


Hi There,
Great Post! I am going to be testing this for our 1607 to 1703 Upgrade.
Currently, in our 1511 to 1703 upgrade, I have a custom lock screen that is bright red and says “DO NOT LOGON” etc…. however if GPO is enabled, the corporate lockscreen simply overwrites at each reboot. So i’ve disabled GPO during the course of my upgrade. Will the above steps work with GPO disabled? Also, i’ve noticed it takes 2 reboots for my new lockscreen to take effect, first reboot the corp lockscreen disappears and is replaced by a default blue screen and then the second reboot it is replaced by the warning lockscreen. Any ideas on how to speed this up?
Thank you in advance.
Did you try to run this step, which should refresh the lock screen: powershell.exe “if((Get-WmiObject win32_computersystem).username -eq $null) {Stop-Process -Name winlogon -Force -Verbose}”
You shouldn’t have to reboot to get the lock screen to change, so GPO shouldn’t matter. if you can get the updated lockscreen to apply before you even reboot, then who cares, the next time the machine reboots, it will already be in the upgrade process.
Basically, that will check if someone is logged on, if there is someone logged on (console session) it skips, but it’s a required deployment, at the logon screen already, it kills the winlogon process, which should reset your lock screen to your RED Do not upgrade lock screen.
Ah I missed that bit. I haven’t tried any of it yet, our 1511-1607 upgrade is live and rolling out, so i’m implementing these improvements into my dev 1607-1703 TS. I’ll let you know how i go. Thanks for the prompt response.
Luke
The problem i have is that I have my inplace upgrade as part of a task sequence… there are several reboots before it gets to the OS UPGRADE step. Which is why i’ve had to kill the GPO service, because GPO will force our corp lockscreen back down. So even if i can’t use the denylogon GPO, I can still use the RED do not logon banner as well as changing the legal notice to DO NOT LOGON.
HI Luke,
How are you disabling GPO from applying during the upgrade? I have the same thing with our legal notice getting overwritten by the GPO.
I was thinking of just disabling the GPO service but I’m not sure what other effects that will have and if it would affect local policy too?!
I don’t see why MS block GPO during a bare metal TS but not an IPU?!
These custom lockscreens don’t seem to work with Windows 10 with Spotlight. any ideas? Obviously, we don’t want to use a GPO to disable Spotlight for the entire environment.
I was able to do this… but it requires changing several registry keys on the logged on user profile (HKCU). Its easy to do, but not so easy to undo if you want to go back to using spotlight. You’d have to add several steps: If User logged on, backup several user keys, change these XX Keys to disable spotlight and enable lockscreen, reset winlogon process. The lock screen should now show up, before the upgrade step, restore the backup of those user’s keys. I haven’t tested that yet, only the changing of the keys. See command from this post, another user had similar question, the keys are the same: https://garytown.com/windows-10-lock-screen
FYI, for non-displaying wallpaper on the lockscreen post-reversal is due to the cache for the SYSTEM account.
Add the following Command Line at the very end of the sequence to flush the wallpaper cache:
del /q “C:\ProgramData\Microsoft\Windows\SystemData\S-1-5-18\ReadOnly\LockScreen_Z\*.*”
Thanks , it very intresting !! you save my life 🙂
Hey, thanks for the blog post.
can you please explain the need of “(Get-WmiObject win32_computersystem).username” before killing ‘winlogon’ process?
thanks
The goal was to avoid killing winlogon if a user was already logged on.
Any reason why you don’t kill logonui.exe instead of winlogon.exe? It works even when someone is logged into the device.